Automating Web Pages with BotCity Inspector
A common practice in web automation development is the use of specific selectors to interact with page elements, as an alternative to computer vision.
This strategy becomes especially appealing when we want to build more resilient code and avoid resolution issues. We can simply interact with the page structure through the properties of the elements.
This tutorial will guide you through the process of creating a simple automation that interacts with elements on a web page.
Creating a new project
The first step is to create a project for web automation. You can follow the same steps outlined in the previous sections.
See how to create a Bot Web Project using the project template.
Inspecting web pages
The attributes and properties of an element can be viewed when inspecting the page being automated.
Generally, this procedure is performed manually, where the properties of each element are individually collected and used in the code as selectors.
To address this scenario, BotCity provides a tool focused on inspecting web pages and generating Python code integrated with the development framework, simplifying and making the use of these resources more intuitive when building automation.
BotCity Web Inspector
To use the BotCity Web Inspector, just install the plugin for BotCity Studio for Visual Studio Code.
After installing the extension and loading a Python project, you will have access to the tool to start inspecting web pages.
Below, you will see more details about using this feature and best practices when inspecting pages and generating code.
Interacting with the browser
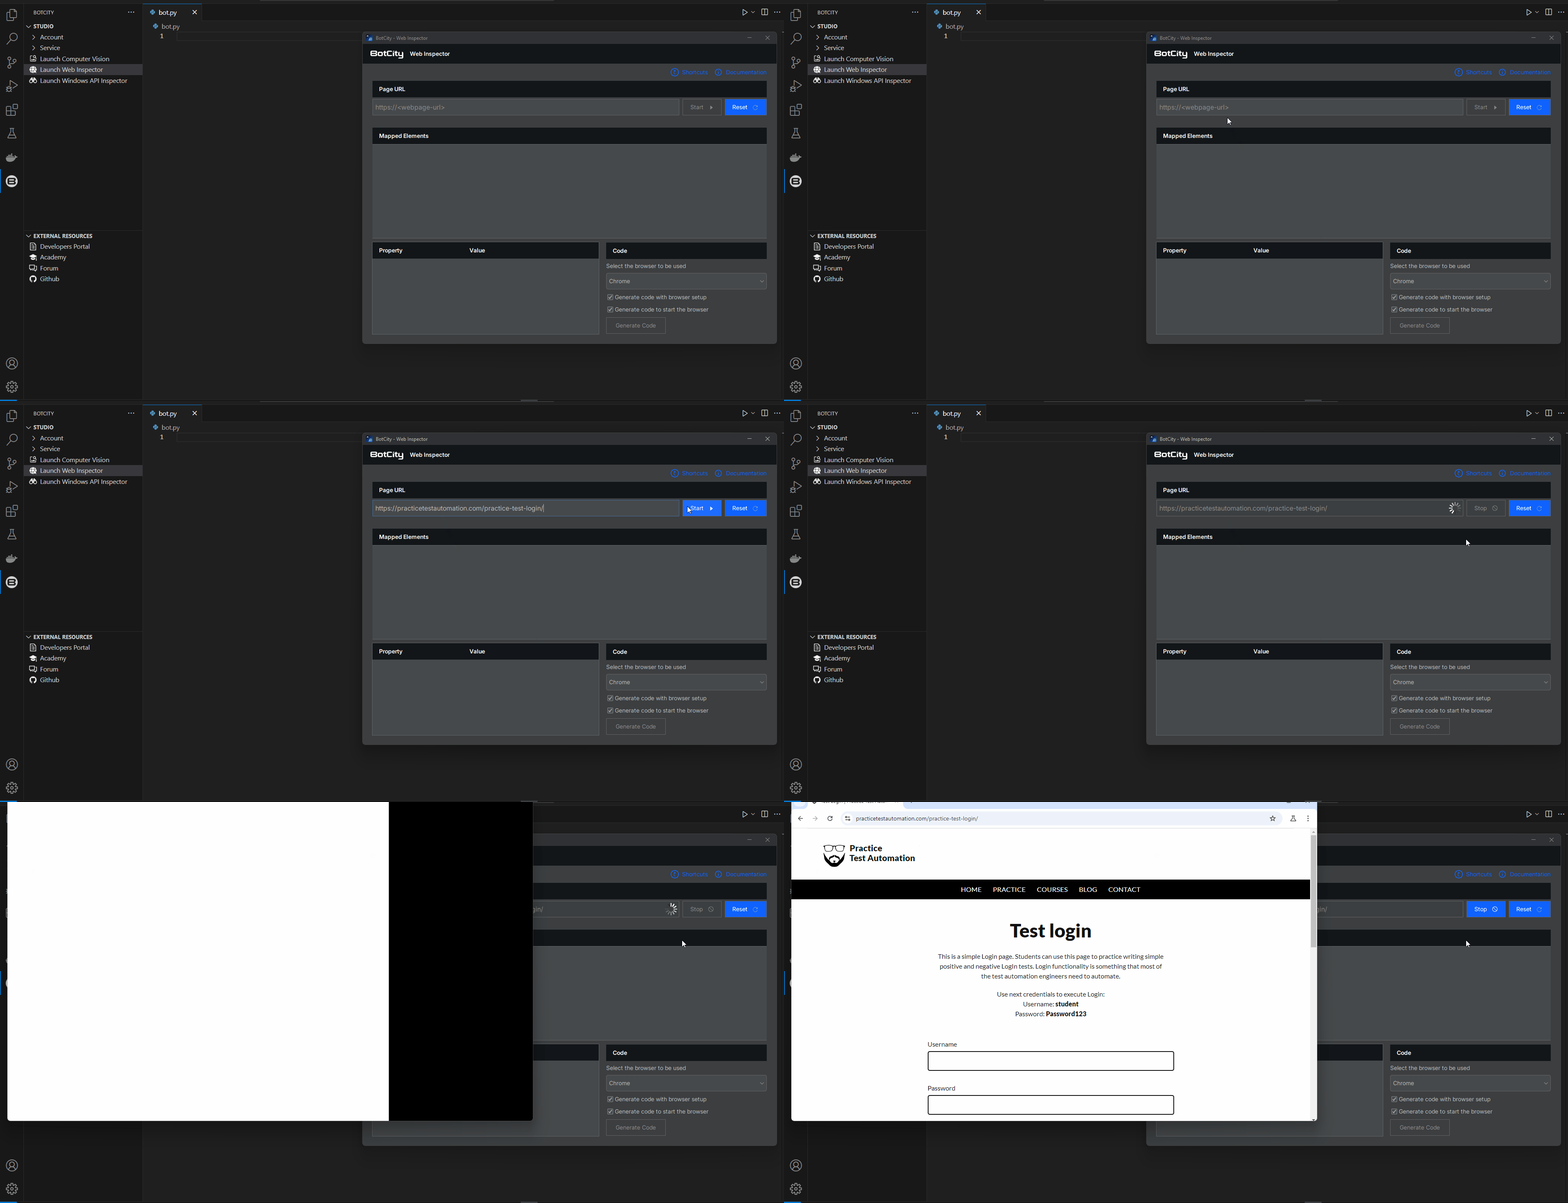
For this simple example, we will use the Practice Test Automation page.
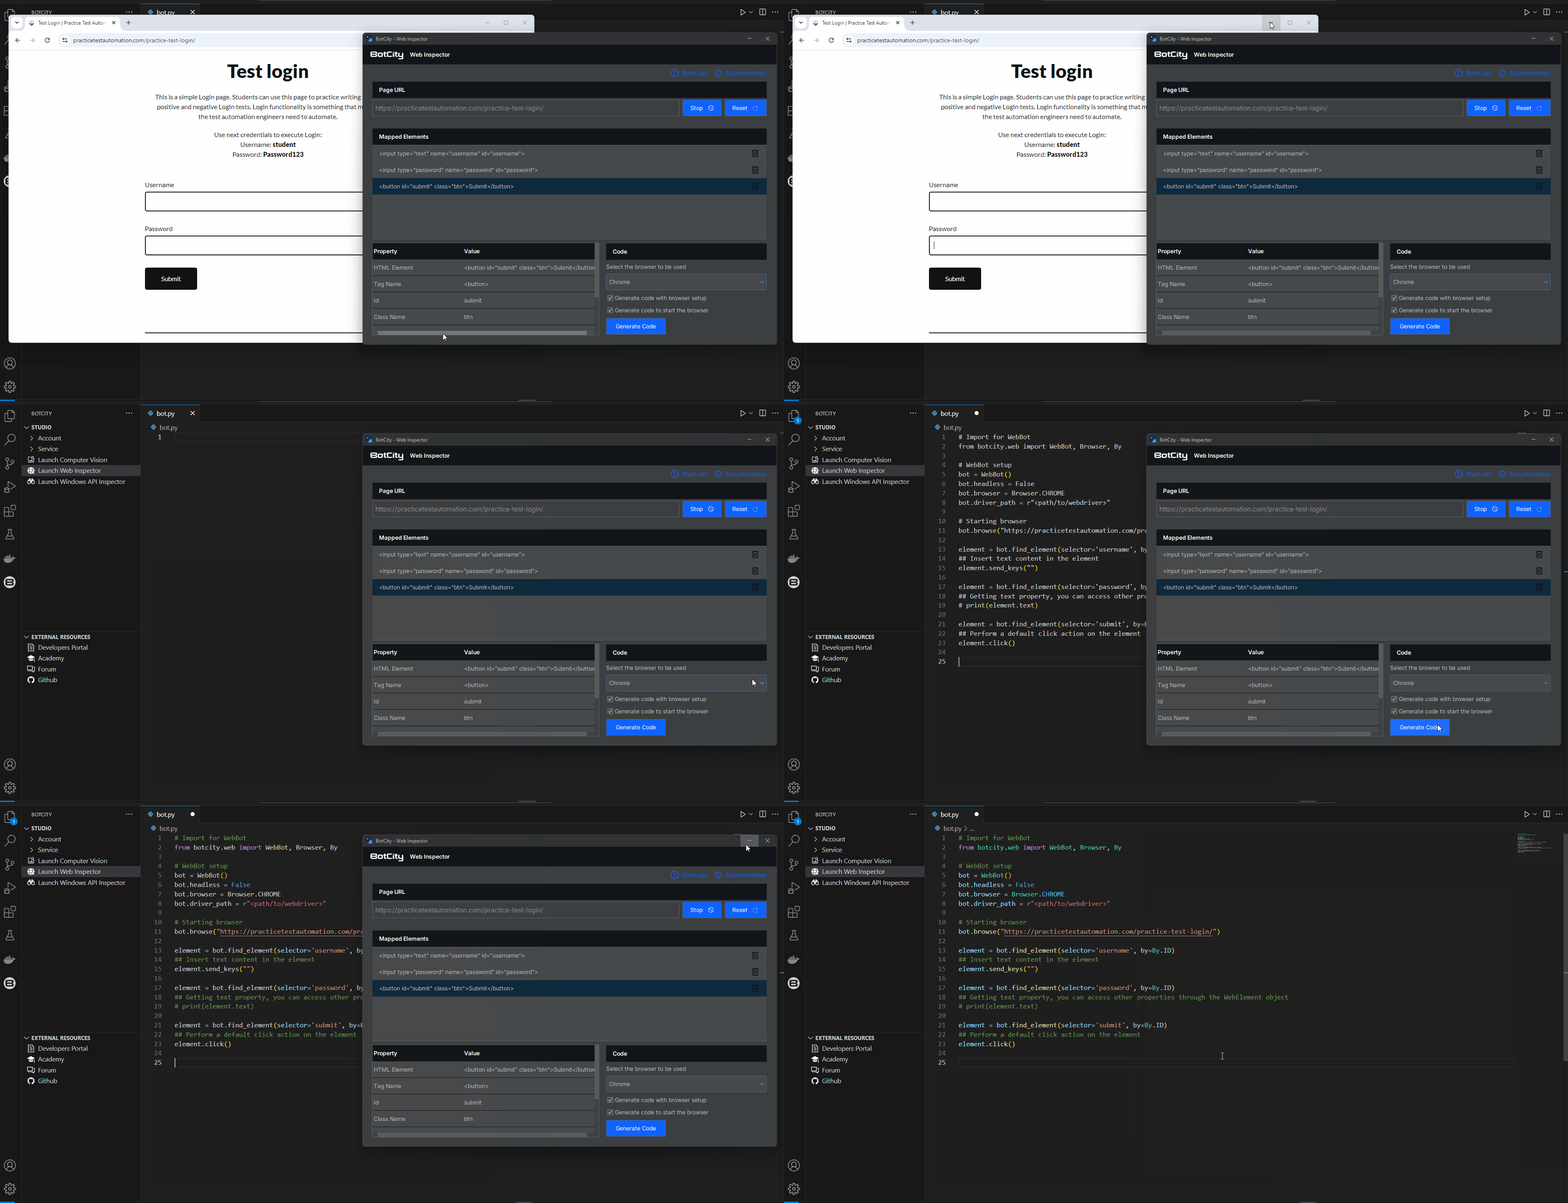
We can pass the page URL to the Web Inspector to start the browser and begin mapping the elements we want to interact with.
Mapping initial elements
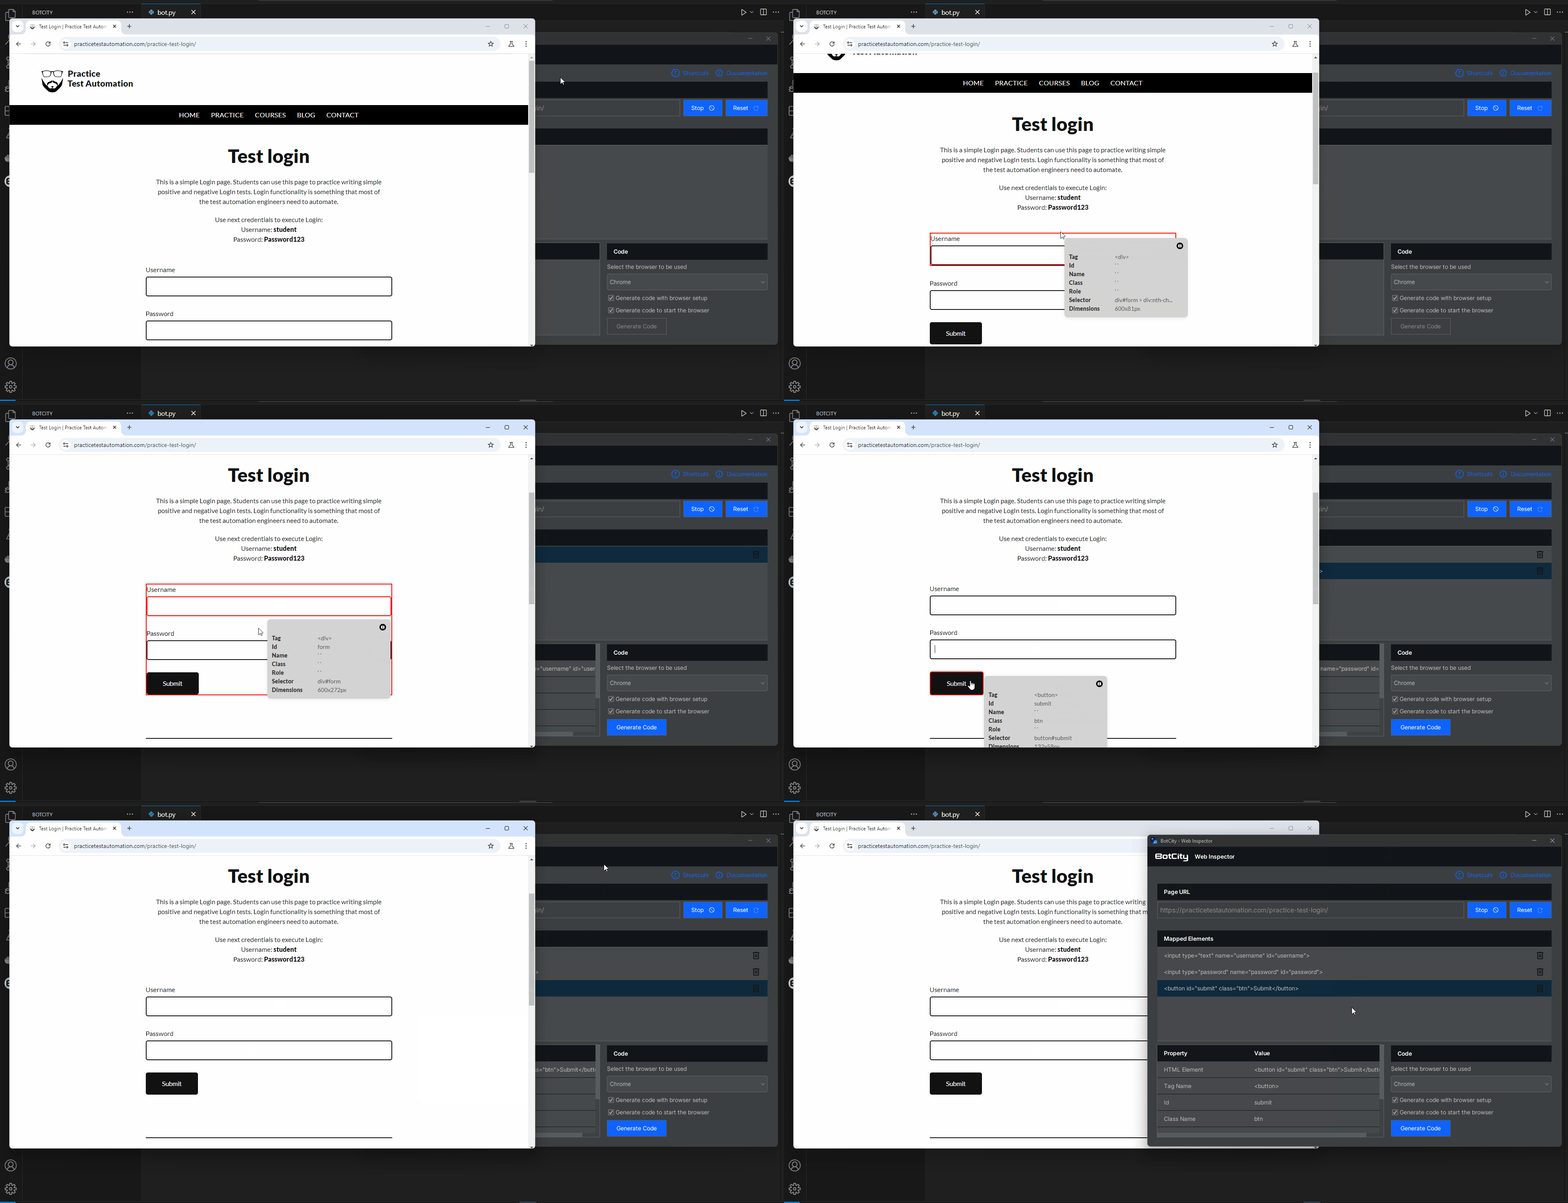
For this process, let's assume the goal is to enter the user's data into the form and validate at the end if the login was successful.
We can, for example, map the text fields Username and Password, as well as the Submit button.
Tip
To map any element using the Web Inspector, simply hover the mouse over the element area and left-click, or use the keyboard shortcut: Alt+C.
Web Inspector resources
Mapped Elements:
Each element mapped within the context of a page is added to the list of mapped elements.
From this list, you can click an element to view its properties or remove an element you no longer want to interact with.
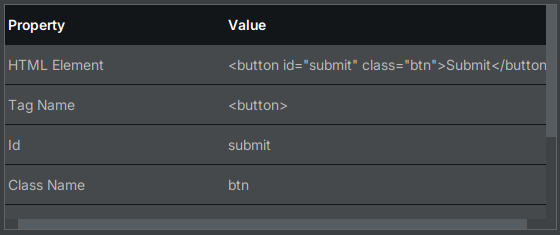
Properties Table:
The BotCity Web Inspector also displays the main properties of a mapped element.
The values in this table can be used as selectors in the code when locating these elements.
Tip
Simply click on the mapped element to display the corresponding properties table.
Generating code from mapped elements
With the initial elements mapped, it is already possible to generate the Python code that will serve as the basis for the automation.
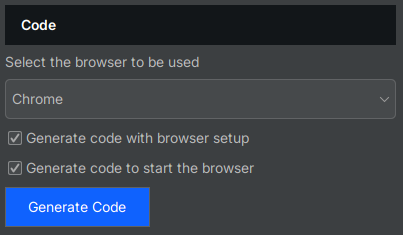
In this section, we can define which browser will be used for access and also the appropriate code snippets for the current context.
-
Generate code with browser setup: Generates the code snippet responsible for configuring the browser to be used.
-
Generate code to start the browser: Generates the code snippet responsible for starting the browser and accessing the page using the provided URL. This option can be unchecked if you already have this snippet in your automation and are just mapping new elements.
The code for locating elements will be automatically generated based on the list of mapped elements.
After configuring the code to be generated, just click the Generate Code button for the BotCity Web Inspector to generate the code directly in the .py file.
Information
The inspector follows this order of priority when generating code:
ID: The inspector initially searches for the inspected element'sID; if present, it will be returned.XPATH: If theIDis not found, the inspector constructs anXPATHbased on available attributes, such asclass,name,role, andtext.CSS SELECTOR: If the previous selectors are not found, the inspector returns theCSS SELECTORof the inspected element.Content Filter: As a last resort, the inspector uses content filters, such ascontains()andtext(), to identify the inspected element.
Finishing the process
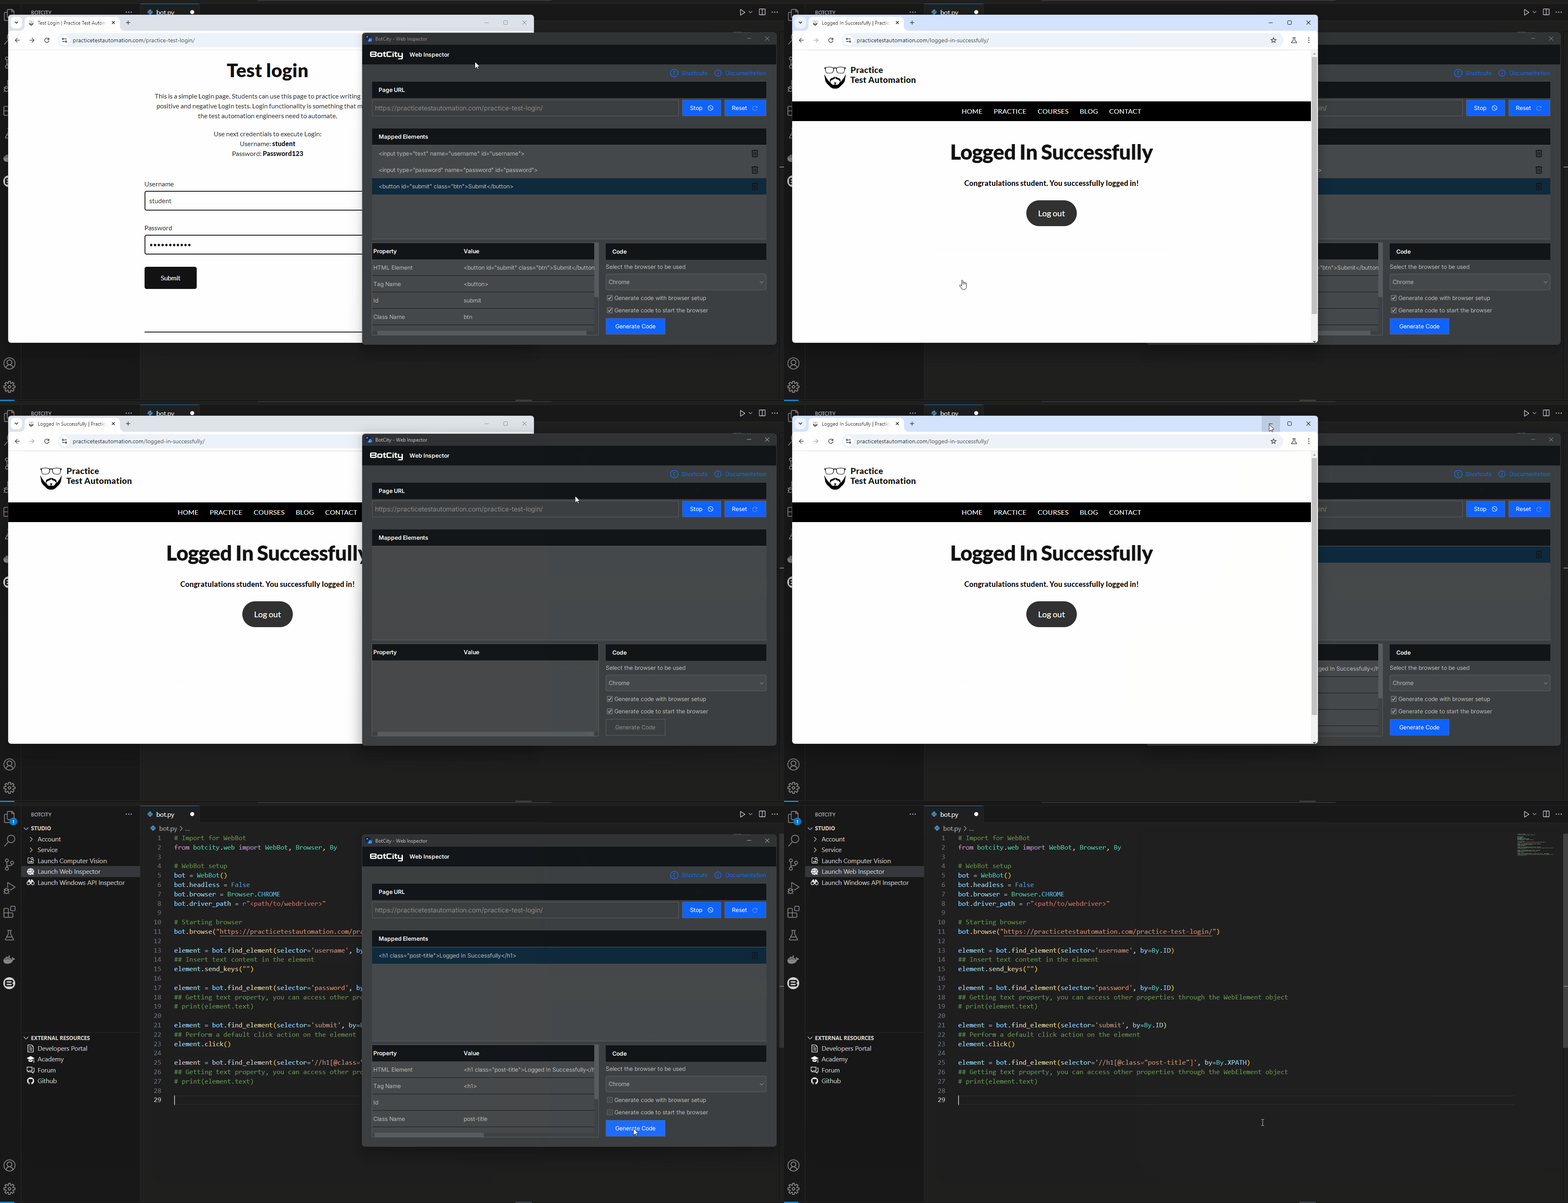
As the last step of the automation, we will map the success message displayed on the page after login. We can continue using the same strategy as before.
Tip
You can use the Reset button in the Web Inspector whenever you want to clear the mapped elements or restart the inspection.
Remember to generate the code before resetting the Web Inspector to avoid losing references to already mapped elements.
Since the base code has already been generated, we can leave the other options unchecked so that only the code for the new mapped element is generated.
Final adjustments and code execution
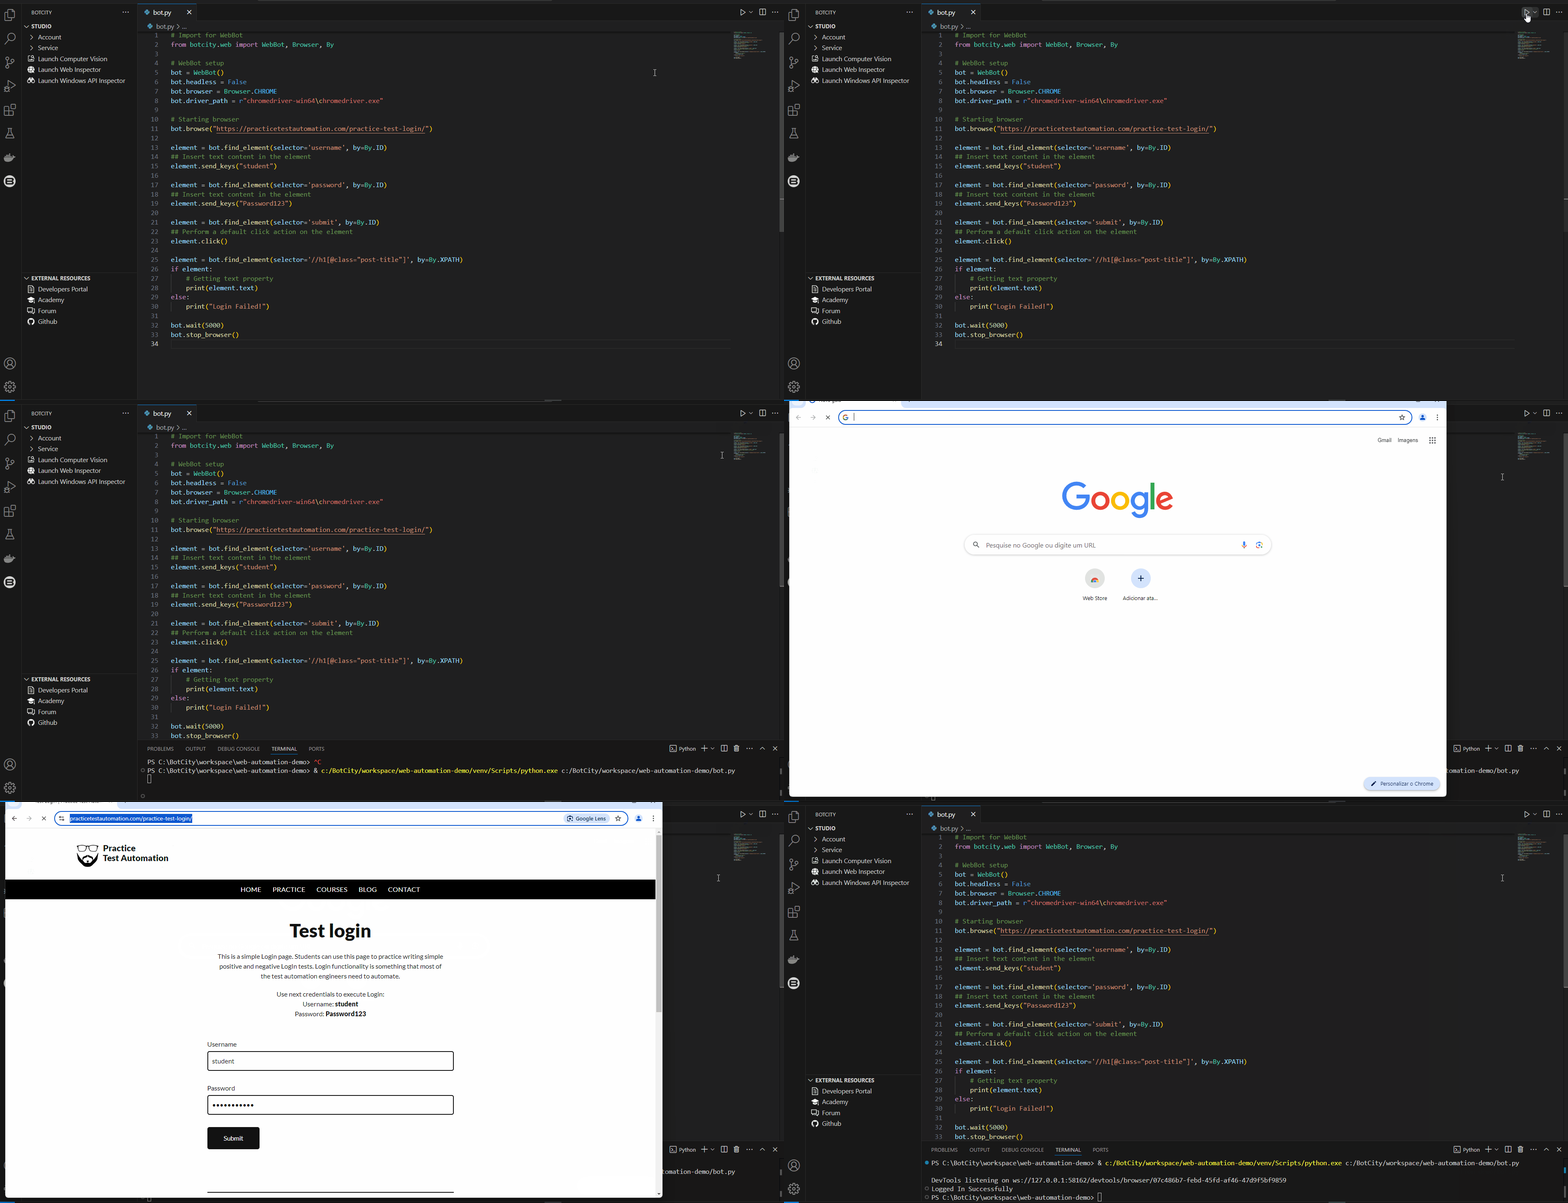
With the base code generated by BotCity Web Inspector, we can refactor and make the necessary adjustments for the process.
In this case, we will simply include the content to be entered into the text fields and validate the final message.
Important
Also remember to adjust the WebDriver path for the browser you are using.
In the snippet where the browser setup is done, you can pass the binary path to the driver_path property or use another library that handles this automatically.
More details here.
Inserting text content into input:
We can simply adjust the send_keys method of the elements related to text inputs, passing a string with the content as a parameter.
Identify the section in your code where these elements are being manipulated and make the following modification:
...
element = bot.find_element(selector='username', by=By.ID)
## Insert text content in the element
element.send_keys("student")

element = bot.find_element(selector='password', by=By.ID)
## Insert text content in the element
element.send_keys("Password123")
Including logic to print success message:
To validate whether the success message was displayed after clicking the Submit button, we can check for the existence of the element on the page.
Identify the section in your code where the element referring to the message is being handled and make the following modification:
...
element = bot.find_element(selector='//h1[@class="post-title"]', by=By.XPATH)
if element:
    # Getting text property
    print(element.text)
else:
    print("Login Failed!")
Exploring the code generated by the Inspector
When running the final code after adjustments, the bot will automatically perform the following actions:
- Open the browser and access the Practice Test Automation page.
- Enter the user and password data and click the login button.
- Verify the success message after the login is completed.
As mentioned earlier, the code generated by the Web Inspector is based on the web development framework from BotCity.
By default, the BotCity Web Inspector will always try to generate as complete code as possible. However, occasional adjustments and treatments may be necessary to ensure the process works as expected.
Searching for elements
The Web Inspector uses some key selectors in the generated code to locate a specific element.
If you want to replace a parameter generated by the Inspector, or if you want to perform more complex adjustments, simply use the properties table as a reference to obtain information about each element.
With this information, pass the selector as a parameter to the find method and use the By class to define the selector type.
Performing actions with elements
For certain types of elements, such as buttons and text fields, the Web Inspector will also generate some suggested actions that can be performed with the element along with the code.
Tip
If the suggested action generated is not exactly what you need, you can check other available actions through the WebElement object and adjust it as needed.
Best practices when using BotCity Web Inspector
Below are some tips and important points that can make it easier to use the Web Inspector during the development of your automations.
Ensure this is the best approach for your process
The operation of the BotCity Web Inspector is directly related to the behavior of the web page being automated.
Therefore, it is important to determine if this strategy is truly the best for your use case.
If the page you are automating makes it difficult to inspect elements or presents resistance to automated access, consider other options such as computer vision or even an approach using a Desktop Bot.
Map and yest your code in parts
To ensure that element references are not lost when changing context, try mapping small sets of elements and generating the corresponding code before closing the browser or moving to a subsequent step in the process.
It is also important to validate in the code if the page is being accessed correctly (remember to use the appropriate browser and WebDriver) and if the elements are being found correctly.
This ensures that at the end of the process all actions are performed as expected.
Validate the interactions accepted by mapped elements
In some cases, interacting with a certain element can be done in several ways.
Depending on the page, a button's action could be performed via a click() or even through a JS script injected into the page.
If you are having difficulty using a particular action, remember to test other available options and validate what works best in your context.
If you have any questions or want to see more content of this type, feel free to explore the BotCity community channels.

