Automating Windows Applications with BotCity Inspector
In some cases, we can automate Windows applications through element properties, as an alternative to computer vision.
This can be a useful alternative when we don't want to worry about resolution issues. We can simply interact with the application structure through the attributes of elements and windows.
This tutorial will guide you through the process of creating a simple automation that interacts with the elements of a Windows application.
Creating a New Project
The first step is to create a project for a desktop automation, you can follow the same steps defined in the previous section.
See how to create a Desktop Bot project using the project template.
Inspection Tools
The attributes and properties of a Windows application can be viewed using inspection tools.
Currently, there are several tools that allow for the inspection of Desktop applications, such as Accessibility Insights for Windows.
However, these tools generally offer basic features for inspecting applications and do not necessarily focus on automation development, requiring additional work to identify properties that can be used in the code when searching for elements.
In light of this scenario, BotCity provides a tool focused on inspecting Desktop applications and generating Python code integrated with the development framework, making the use of these resources more simplified and intuitive when building automation.
BotCity Windows Inspector
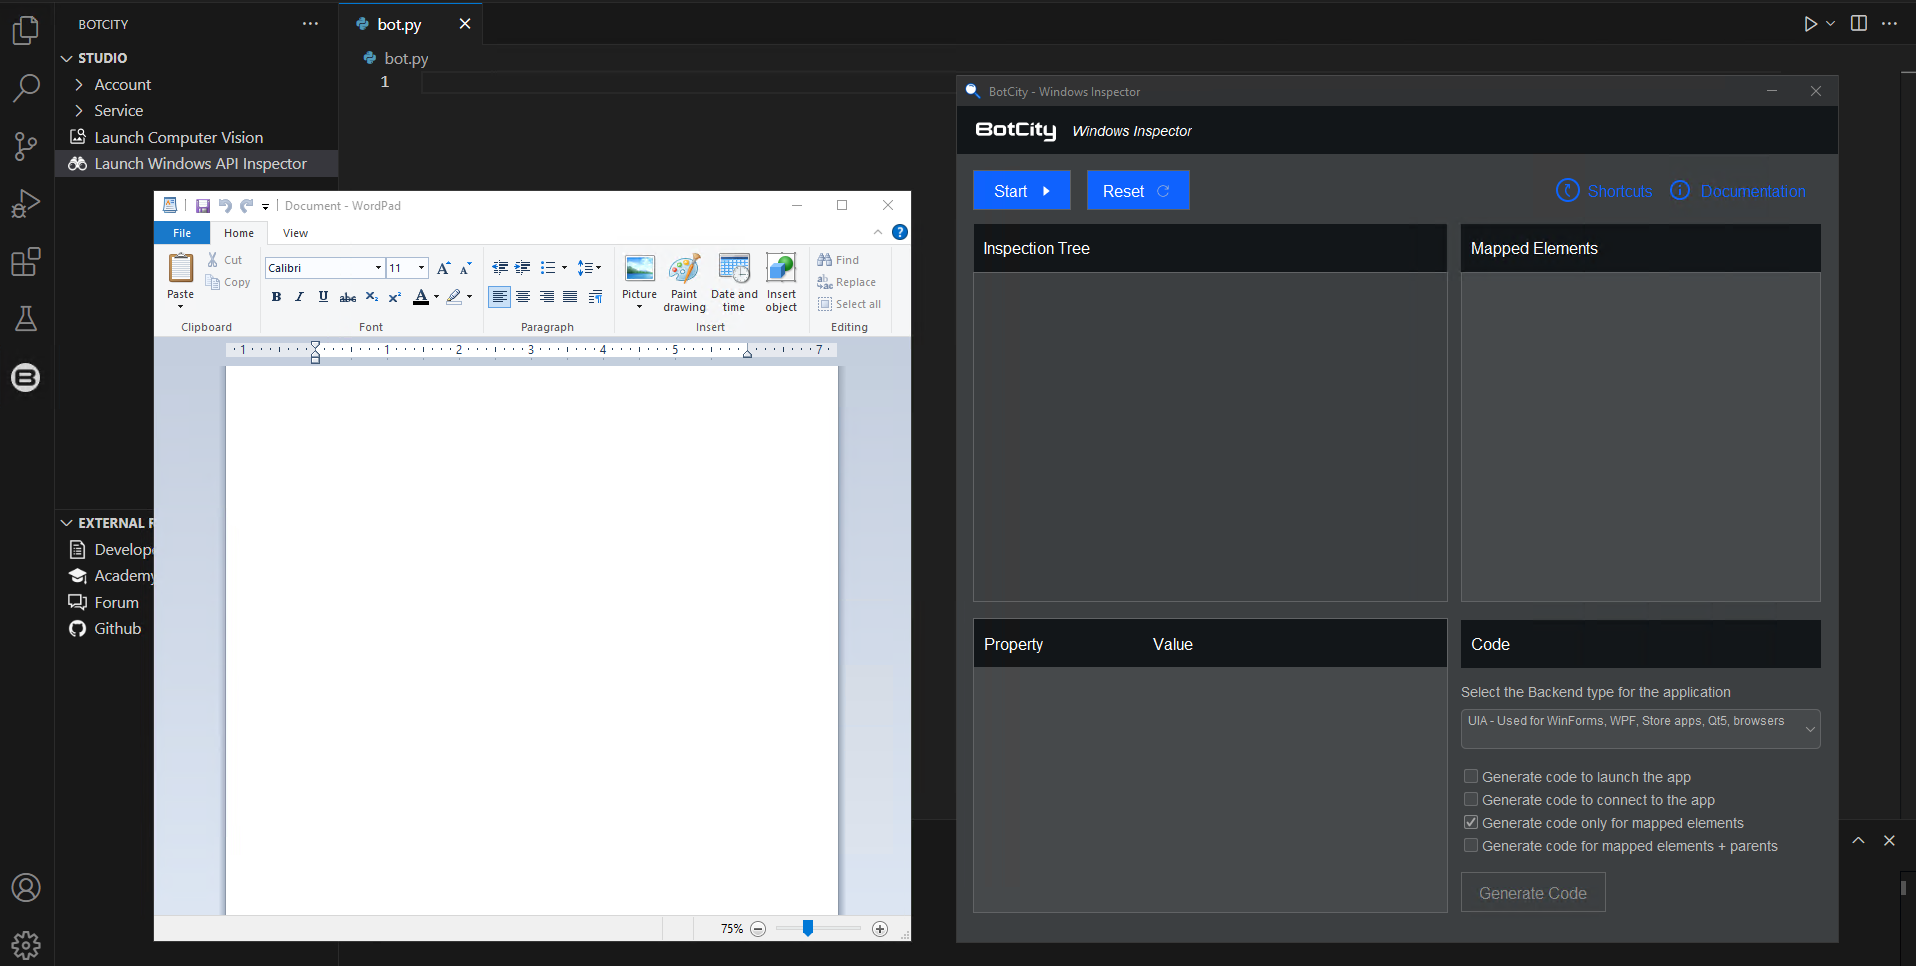
To use the BotCity Windows Inspector, simply install the plugin for BotCity Studio for Visual Studio Code.
After installing the extension and loading a Python project, you will have access to the tool to start inspecting applications on Windows.
Next, you will see more details about using this feature and also best practices when inspecting applications and generating code.
Interacting with the application
For this simple example, we will use the standard Wordpad of Windows.
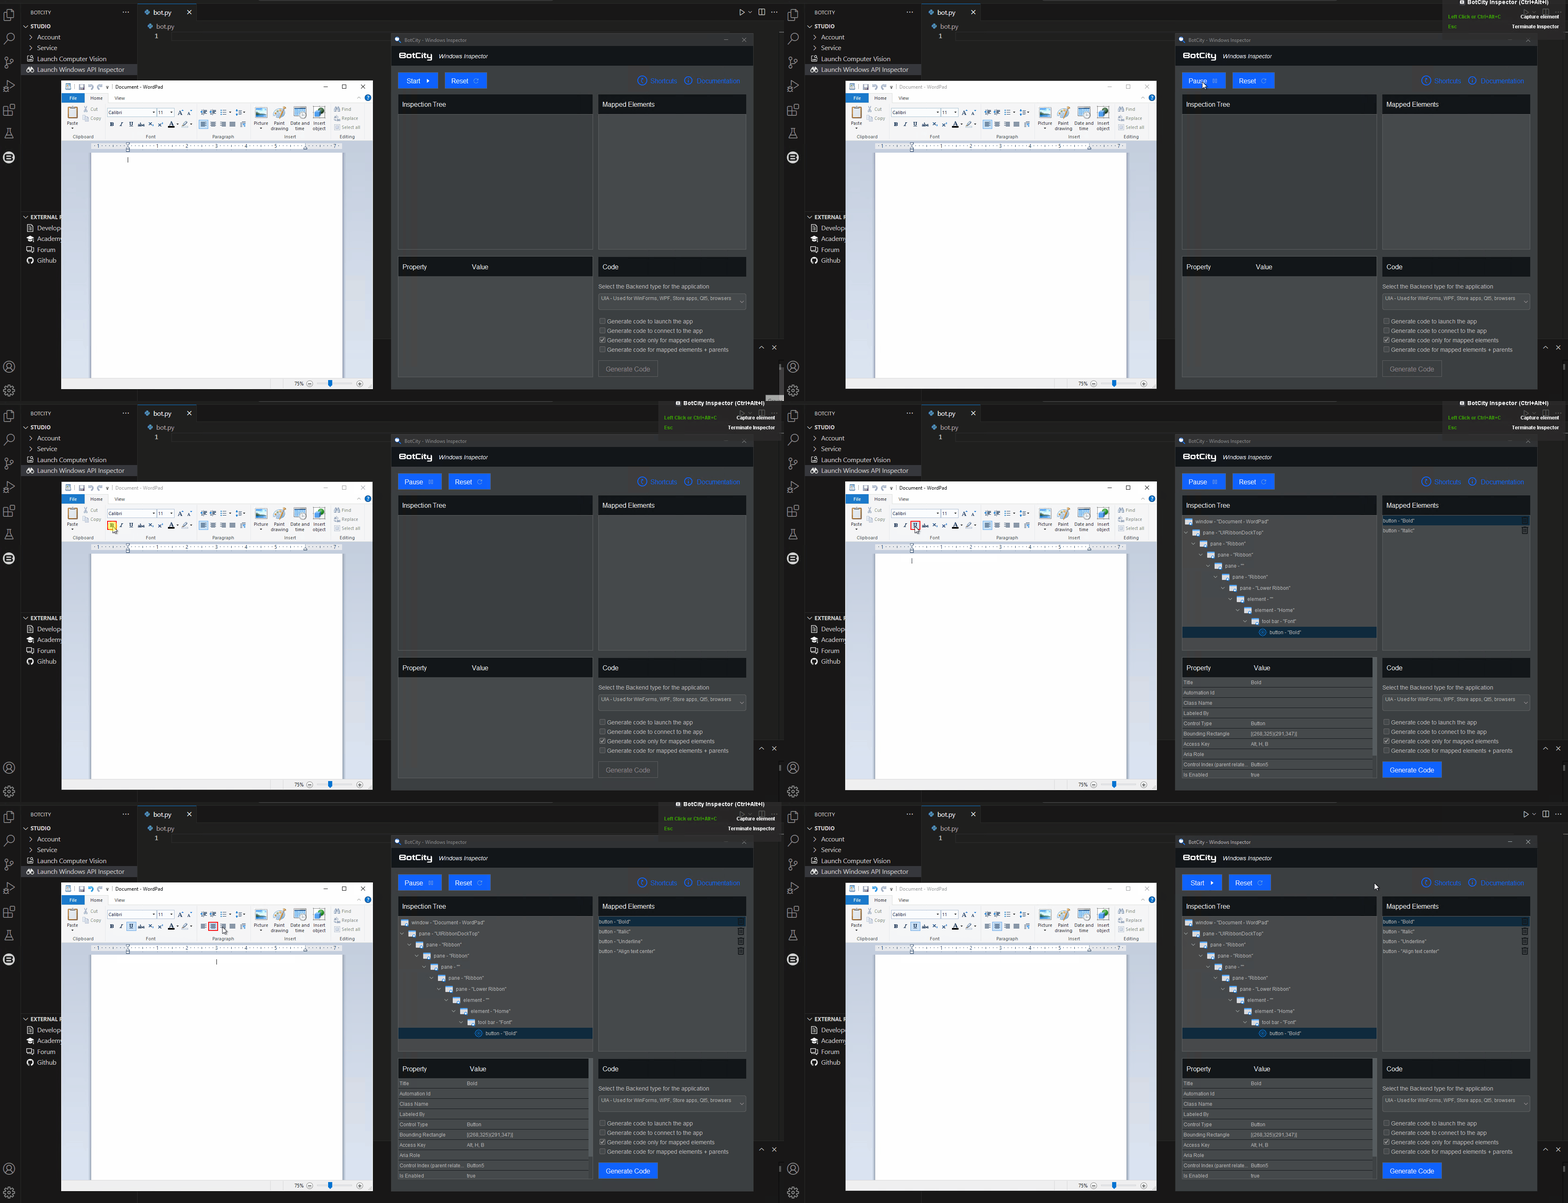
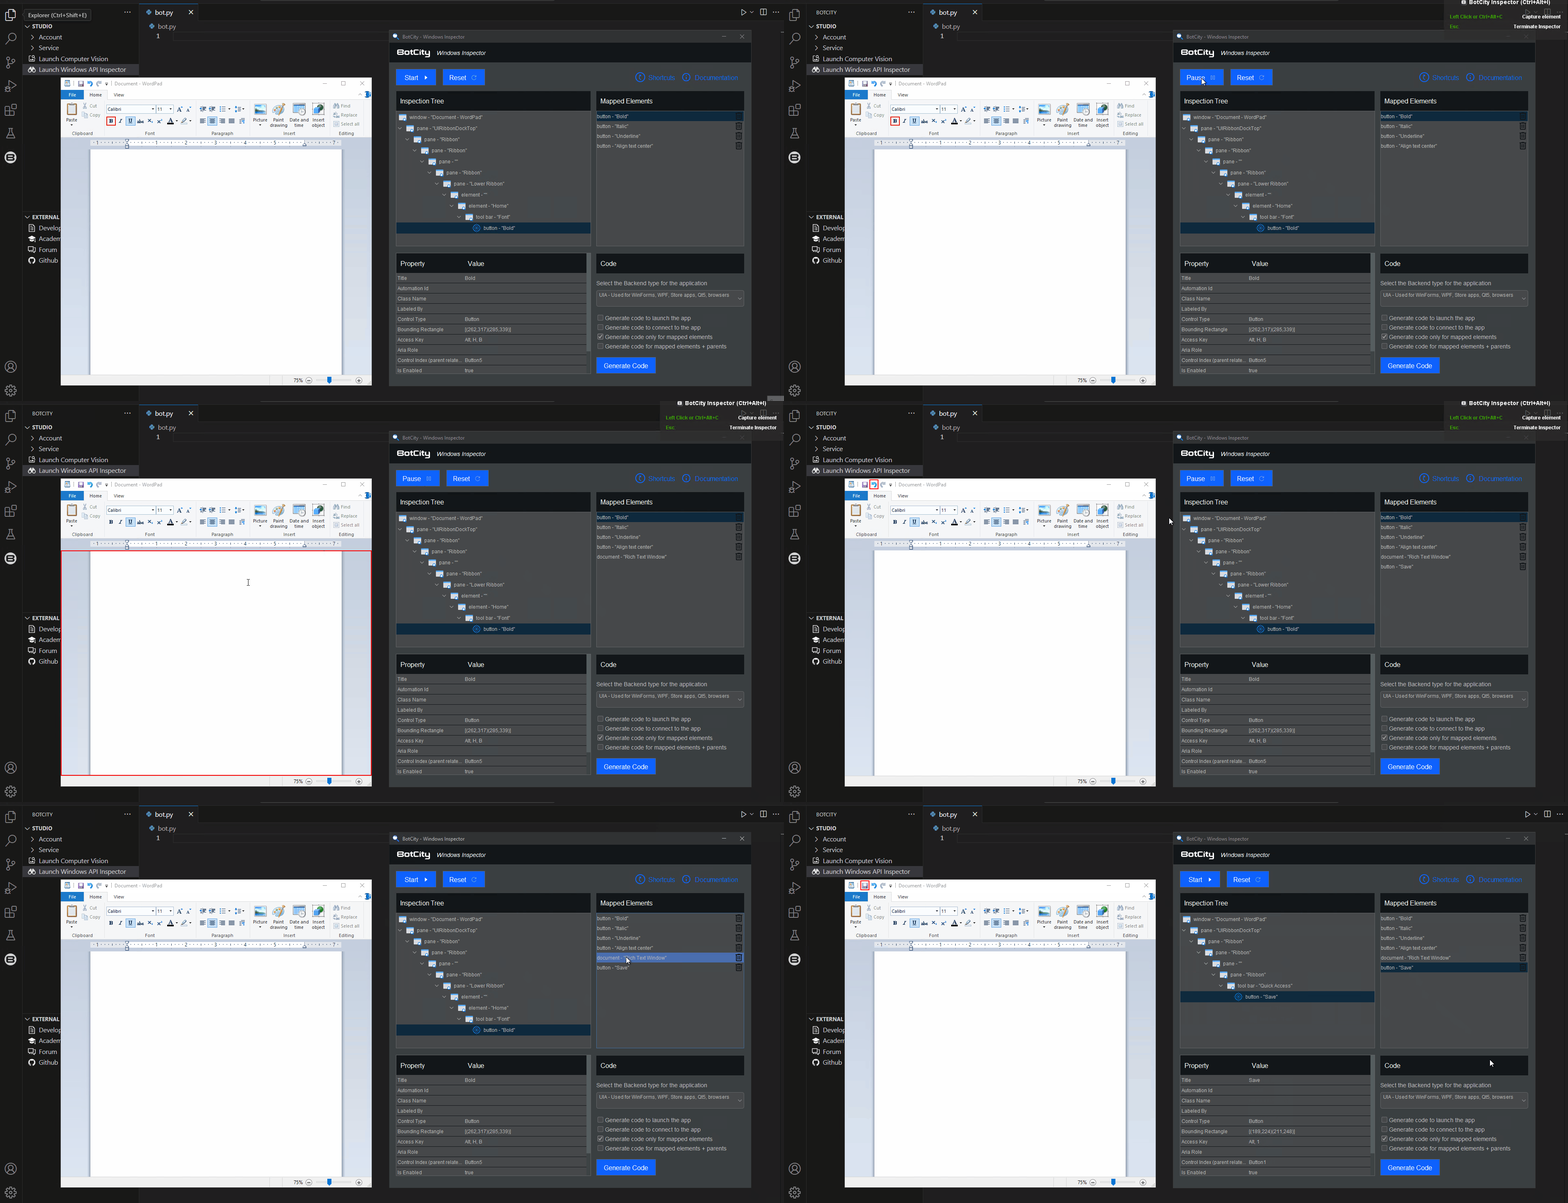
With the application open and the help of BotCity Windows Inspector, we can start mapping the elements we wish to interact with.
Mapping the initial elements
Initially, let's assume the intention is to interact with the buttons related to text font configuration.
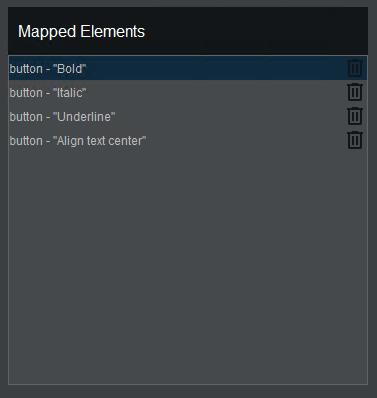
For example, we can map the Bold, Italic, and Underline buttons of Wordpad, as well as the button to center the text.
Tip
To map any element using the Windows Inspector, just position the mouse over the element area and click the left mouse button, or simply use the keyboard shortcut: Ctrl+Alt+C.
Windows Inspector resources
Mapped Elements:
Each element that is mapped in the context of an application is added to the list of mapped elements.
From this list, you can click on an element to view its properties or remove an element you no longer wish to interact with.
Inspection Tree:
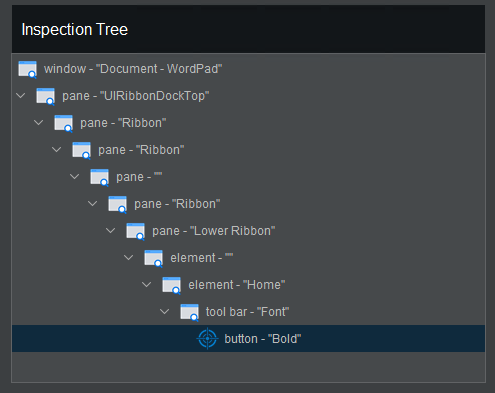
By clicking on an element in the list, the corresponding inspection tree will be generated.
This way, it is possible to visualize the "full path" from the main window of the application to the target element that has been mapped.
Properties Table:
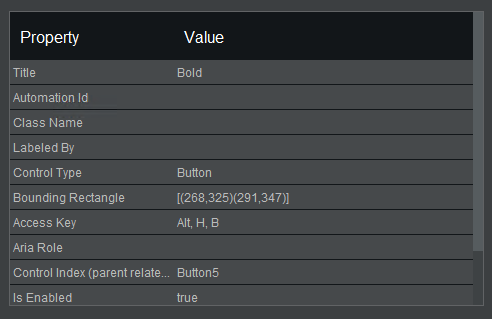
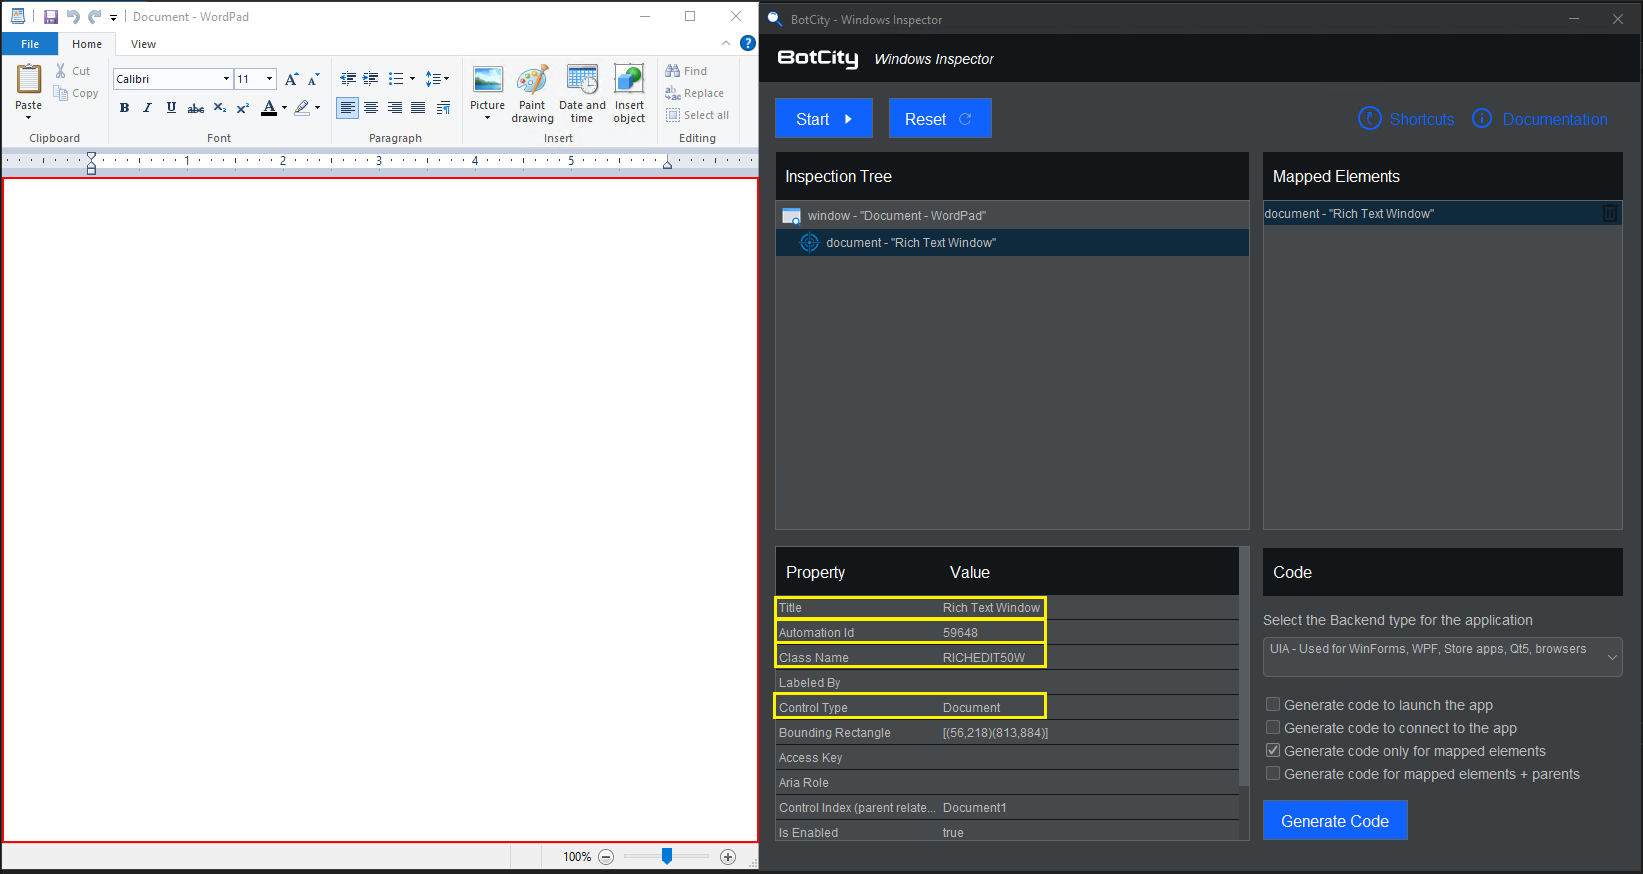
In addition to the inspection tree, the BotCity Windows Inspector also displays all existing properties of a mapped element.
The values in this table can be used as selectors in the code when searching for these elements.
Tip
It is possible to view the properties table of each existing element in the inspection tree.
Just click on the desired element for the corresponding properties table to be displayed.
Continuing the mapping
Before we move on to the code generation stage, let's map a few more elements.
Going back to Wordpad, we can click the Start button on the Windows Inspector again to continue the mapping.
This time, we will map, for example, the area of the document where the text is inserted and also the button to save the document.
Generating code from mapped elements
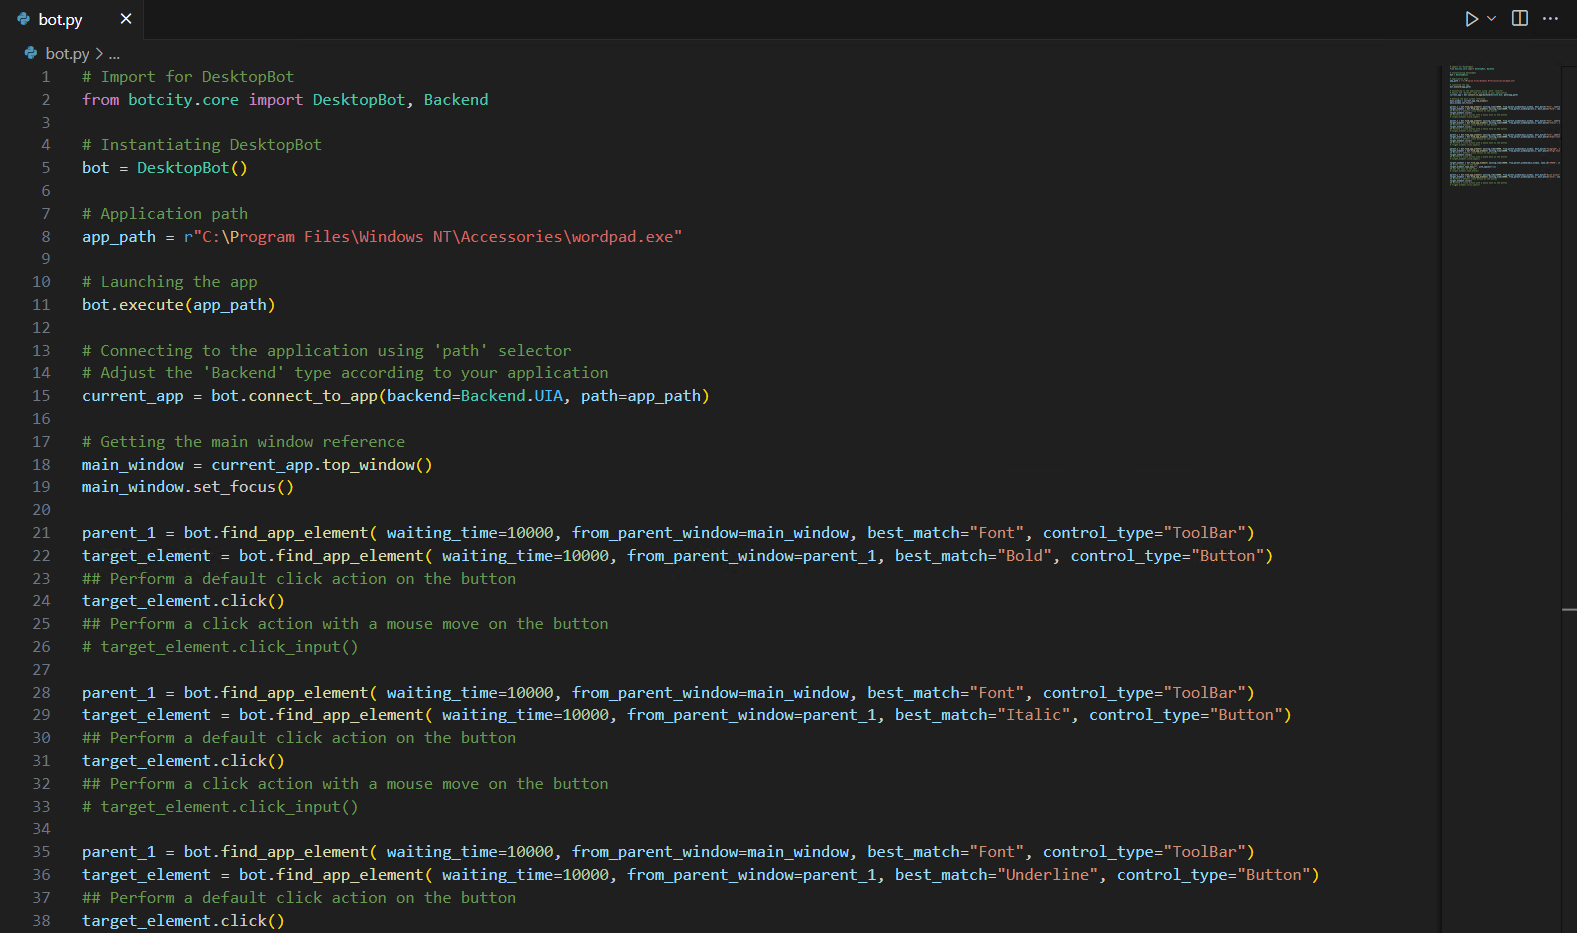
With the initial elements mapped, we can now generate the Python code that will be used as the basis for the automation.
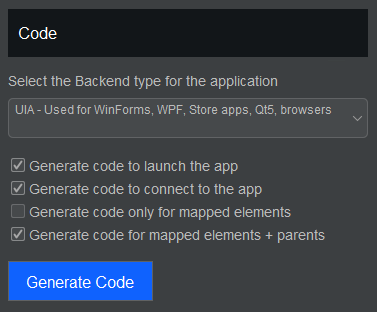
In this section, we can define what the Backend will be for this application and also the appropriate code snippets for the current context.
- Generate code to launch the app: Generates the code snippet responsible for launching the application being mapped (assuming that every time the automation is executed, the application will start from scratch).
- Generate code to connect to the app: Generates the code snippet responsible for establishing a connection with the open instance of the application. This option can be unchecked if you already have this code snippet in your automation and are only mapping new elements.
- Generate code only for mapped elements: Generates the code using the selectors for each element in the list of mapped elements. This option does not consider the reference of parent elements in the generated code, so it may be necessary to adjust the parameters according to your needs.
- Generate code for mapped elements + parents: Generates the code using the selectors for each element in the list of mapped elements considering the parent elements. This option is recommended if you want the Inspector to generate code as close as possible to the final version.
After configuring the code to be generated, just click the Generate Code button for BotCity Windows Inspector to generate the code directly in the .py file.
Info
The Python code generated by Windows Inspector is based on the Desktop Framework from BotCity.
If you are using other libraries together, make the necessary adjustments to your automation code.
Saving the document and finishing the process
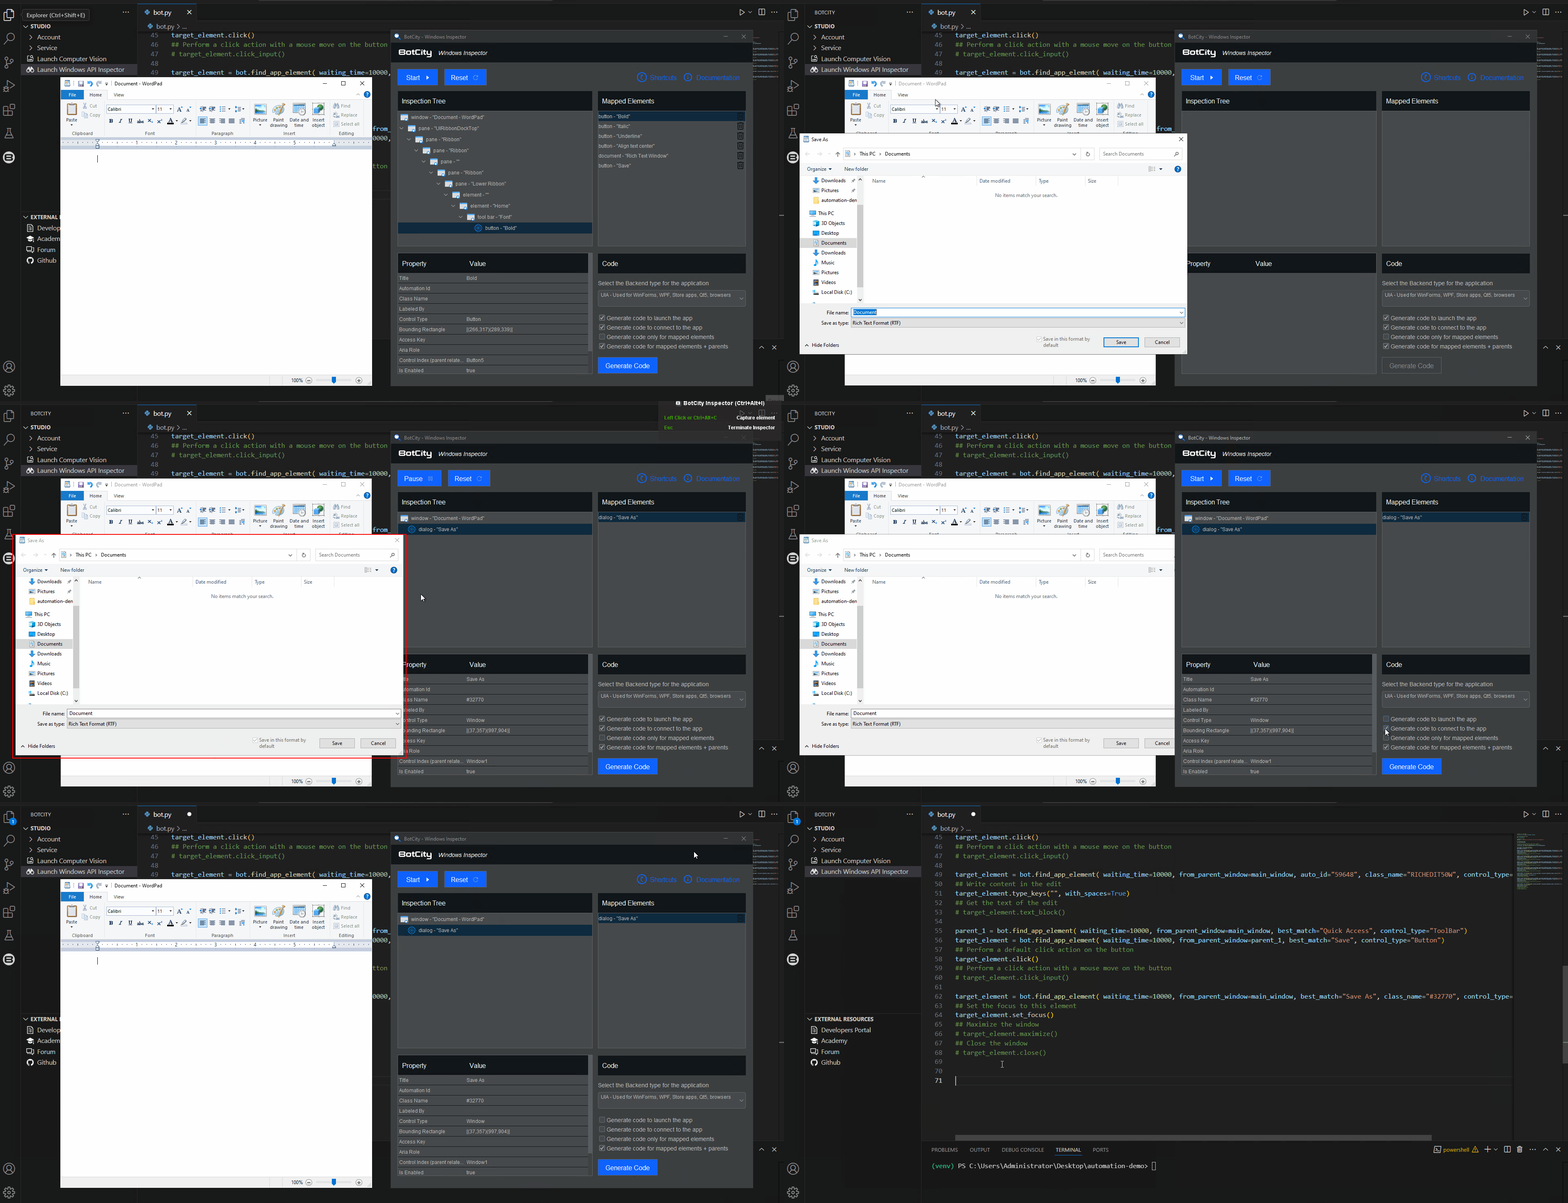
As the last step of the automation, we will map the window that opens when we click the "Save" button. We can continue using exactly the same strategy we used before.
In this case, instead of mapping a specific element of the "Save as" window, we can map only the region of the main window itself.
In the code, we will later use a strategy to insert the path and save the document using this window reference.
Tip
You can use the Reset button of the Windows Inspector whenever you want to clear the mapped elements and restart the inspection.
Remember to generate the code before resetting the Windows Inspector to avoid losing the reference to already mapped elements.
Since the base code has already been generated previously, we can only check the option to generate the code related to the newly mapped element.
Final adjustments and code execution
With the base code generated by the BotCity Windows Inspector, we can refactor and make any necessary adjustments for the process.
In this case, we will simply include in the code the content that will be inserted into the document and also the path to save the file at the end.
Inserting text content in the document area:
We can simply adjust the type_keys method of the element related to the document, passing a string with the content as a parameter.
Identify in your code the section where this element is being manipulated and make the following modification:
...
target_element = bot.find_app_element(waiting_time=10000, from_parent_window=main_window, auto_id="59648", class_name="RICHEDIT50W", control_type="Document")
## Write content in the edit
target_element.type_keys("Hello! Welcome to BotCity!", with_spaces=True)
## Get the text of the edit
# target_element.text_block()
Passing the path to save the file:
To save the file, we will use a very interesting strategy using the "Save As" window that we mapped earlier.
With the reference of the window, we can again use type_keys to insert the file path as well as to execute an Enter action in the window.
Identify in your code the section where this element related to the "Save As" window is being manipulated and make the following modification:
...
target_element = bot.find_app_element(waiting_time=10000, from_parent_window=main_window, best_match="Save As", class_name="#32770", control_type="Window")
## Set the focus to this element
target_element.set_focus()
target_element.type_keys(r"C:\Users\Administrator\Documents\document.rtf")
target_element.type_keys("{ENTER}")
Tip
This strategy for executing a specific key action or a keyboard shortcut in the context of a window is a feature of the pywinauto library and can be quite useful depending on your use case.
See more details about some strategies that can be used and other useful tips in the section Exploring the code generated by the Inspector
Exploring the code generated by the Inspector
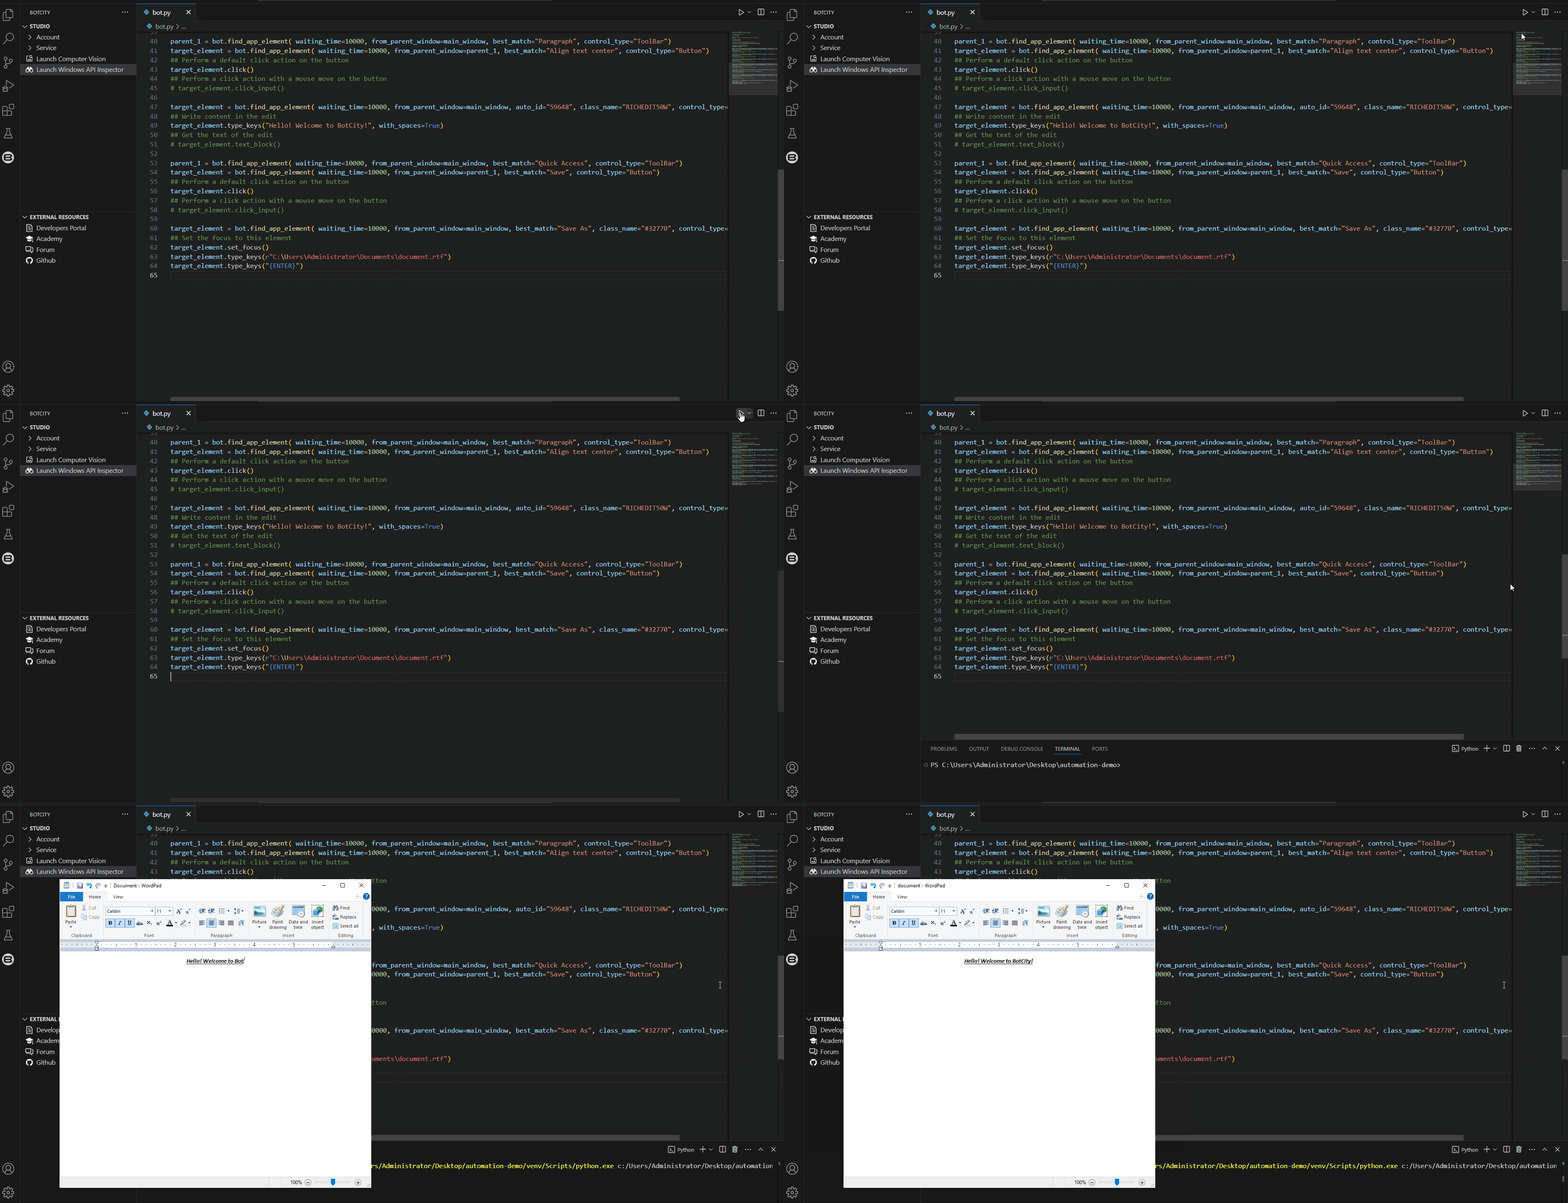
When we run the final code after the adjustments, the bot will automatically perform the following actions:
- Open Wordpad
- Establish a connection with the application
- Perform the defined interactions: center the paragraph, click the Bold, Italic, and Underline buttons
- Type the text in the document area and save the file in the defined path
As mentioned earlier, the code generated by the Windows Inspector uses the Windows Applications module of the BotCity desktop development framework.
Info
The Windows Applications module is based on the functionalities of the pywinauto library.
See more details about the features of this library in this link.
By default, the BotCity Windows Inspector will always try to generate the most complete code possible. However, adjustments and treatments may be necessary to ensure that the process works as expected.
Searching for elements
The Windows Inspector uses some key selectors in the code it generates to find a specific element.
The table below better describes some selectors that can be used:
| Selector | Description |
|---|---|
| class_name | Elements with this window class |
| class_name_re | Elements whose class matches this regular expression |
| parent | Elements that are children of this |
| process | Elements running in this process |
| title | Elements with this text |
| title_re | Elements whose text matches this regular expression |
| top_level_only | Top level elements only (default=True) |
| visible_only | Visible elements only (default=True) |
| enabled_only | Enabled elements only (default=False) |
| best_match | Elements with a title similar to this |
| handle | The handle of the element to return |
| ctrl_index | The index of the child element to return |
| found_index | The index of the filtered out child element to return |
| predicate_func | A user provided hook for a custom element validation |
| active_only | Active elements only (default=False) |
| control_id | Elements with this control id |
| control_type | Elements with this control type (string; for UIAutomation elements) |
| auto_id | Elements with this automation id (for UIAutomation elements) |
| framework_id | Elements with this framework id (for UIAutomation elements) |
| backend | Back-end name to use while searching (default=None means current active backend) |
If you wish to replace a parameter generated by the Inspector, or want to make a more complex combination, just use the properties table as a reference to obtain the information for each element.
With these values in hand, simply pass them as parameters to the find_app_element method.
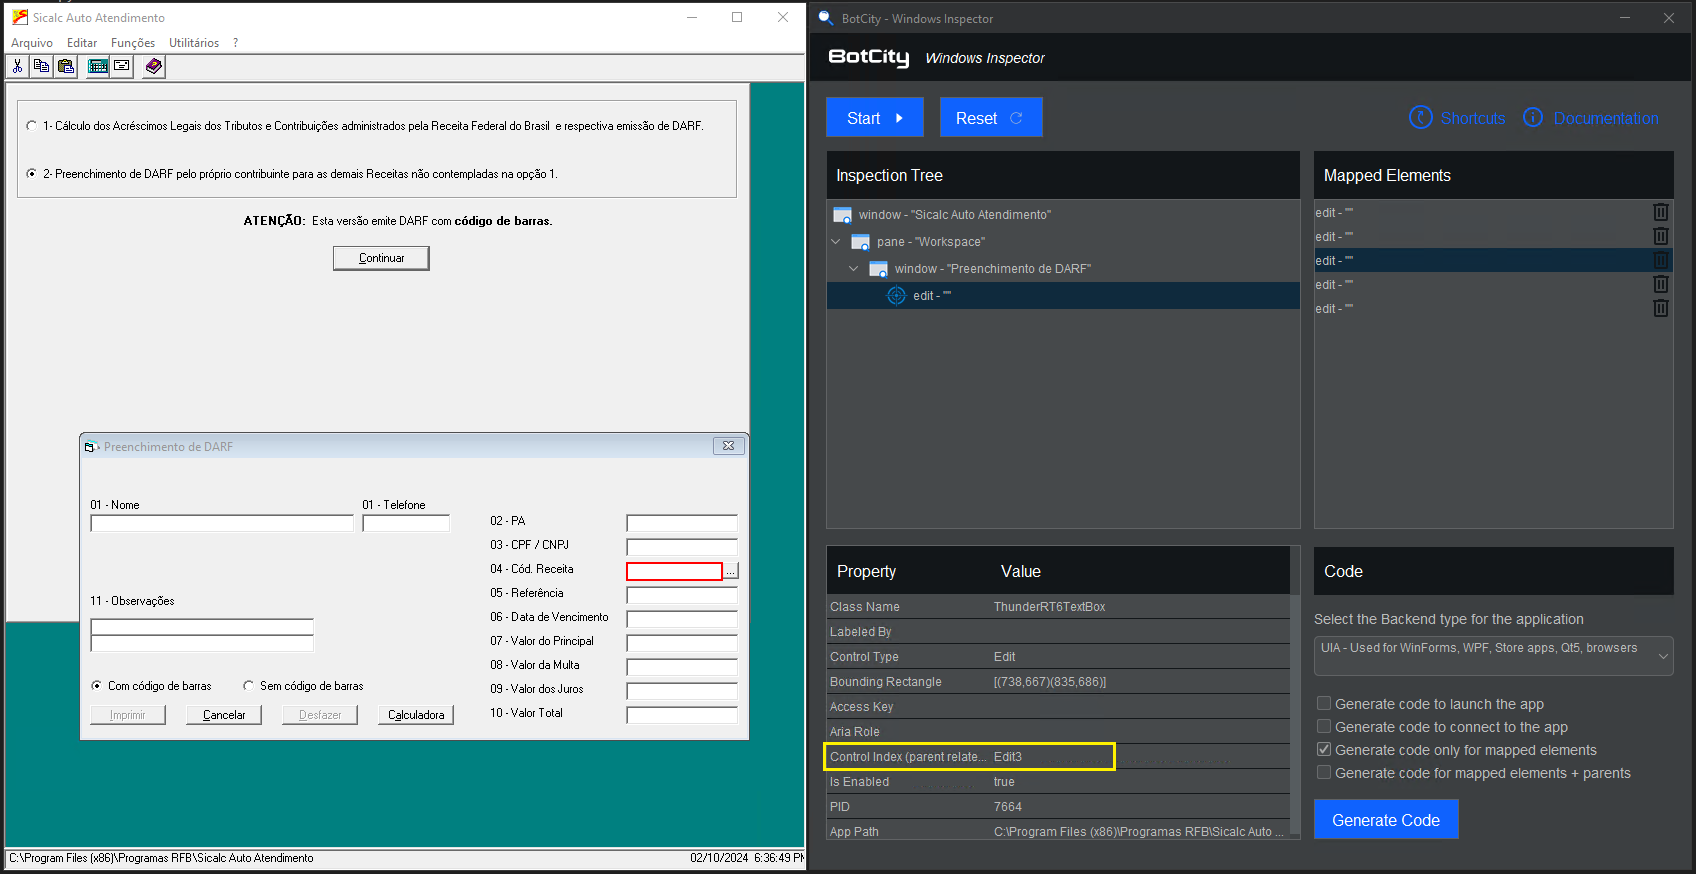
Another interesting alternative is to access a specific element by its index, in relation to its parent element.
This type of approach becomes quite useful when there are no unique properties to filter by an element, or when multiple identical elements share the same properties.
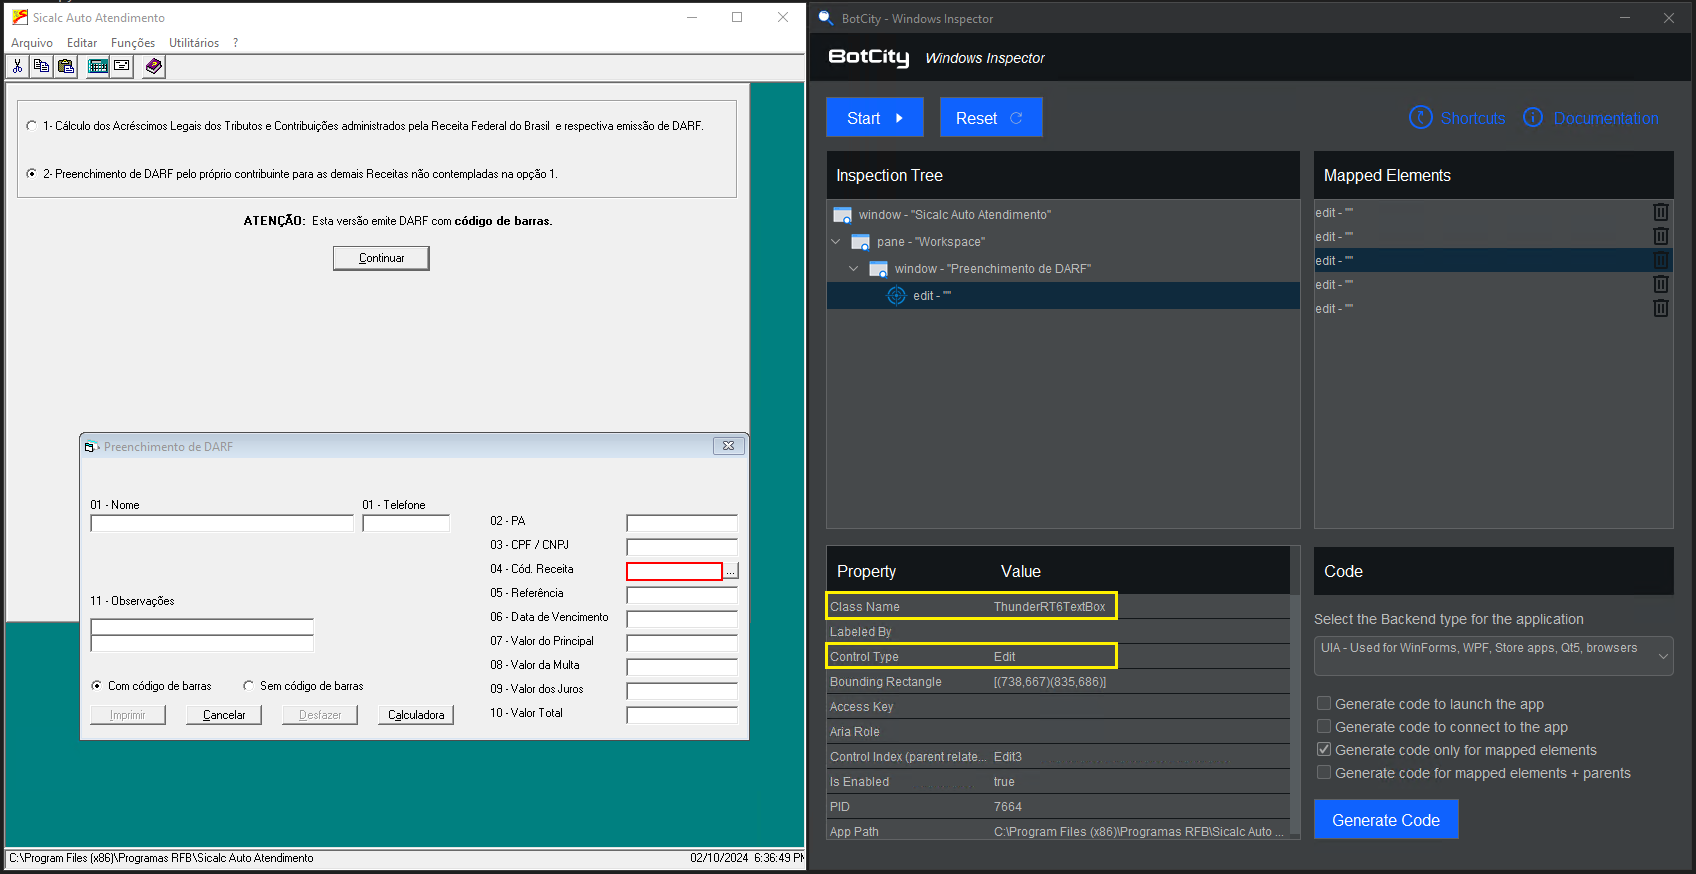
In the scenario above, we have several 'Edit' type elements with shared properties and no unique identifiers.
This would make it difficult to search for a specific element since several elements could match the same filter.
# This code would end up being generic
# as it would not be filtering for a specific element
target_element = bot.find_app_element(
    waiting_time=10000,
    from_parent_window=parent_form,
    class_name="ThunderRT6TextBox",
    control_type="Edit"
)
In this scenario, we could use the parent element as a reference, and from it access the target element through its index.
# With the reference of the parent element,
# we can access an element by its index
target_element = parent_form.Edit3
target_element.type_keys("", with_spaces=True)
Tip
If you are experiencing any issues finding an element, or wish to perform more elaborate handling, feel free to customize the selectors and the logic of the code generated by Windows Inspector at any time.
Visualizing the application structures in the code
If for any reason you need to take a deeper look at the structure of a specific window or element in the application directly in the code, you can use specific methods from pywinauto.
With the element reference in hand, simply call the dump_tree() or print_control_identifiers() method to display the element's structure in the terminal.
This alternative is quite interesting if you are having trouble searching for specific elements and want to debug.
# Obtaining the reference of the element,
# for example, the main window of the application
main_window = current_app.top_window()
# Displaying the component structure directly in the terminal
main_window.dump_tree()
Example output of the dump_tree() method
Through the generated tree, you will be able to visualize in more detail the structure of the application and the identifiers of the elements.
Control Identifiers:

Dialog - 'Document - WordPad'    (L48, T42, R821, B918)
['Document - WordPadDialog', 'Dialog', 'Document - WordPad']
child_window(title="Document - WordPad", control_type="Window")
|
| Pane - 'UIRibbonDockTop'    (L56, T73, R813, B189)
| ['UIRibbonDockTop', 'Pane', 'UIRibbonDockTopPane', 'Pane0', 'Pane1']
| child_window(title="UIRibbonDockTop", control_type="Pane")
|    |
|    | Pane - 'Ribbon'    (L56, T73, R813, B189)
|    | ['RibbonPane', 'Ribbon', 'Pane2', 'RibbonPane0', 'RibbonPane1', 'Ribbon0', 'Ribbon1']
|    | child_window(title="Ribbon", control_type="Pane")
|    |    |
|    |    | Pane - 'Ribbon'    (L56, T73, R813, B189)
|    |    | ['RibbonPane2', 'Ribbon2', 'Pane3']
|    |    | child_window(title="Ribbon", control_type="Pane")
|    |    |    |
|    |    |    | Pane - ''    (L56, T73, R813, B220)
|    |    |    | ['Pane4']
|    |    |    |    |
|    |    |    |    | Pane - 'Ribbon'    (L56, T42, R813, B189)
|    |    |    |    | ['RibbonPane3', 'Ribbon3', 'Pane5']
|    |    |    |    | child_window(title="Ribbon", control_type="Pane")
|    |    |    |    |    |
|    |    |    |    |    | Toolbar - 'Quick Access'    (L94, T47, R160, B69)
|    |    |    |    |    | ['Toolbar', 'Quick AccessToolbar', 'Quick Access', 'Toolbar0', 'Toolbar1']
|    |    |    |    |    | child_window(title="Quick Access", control_type="ToolBar")
|    |    |    |    |    |    |
|    |    |    |    |    |    | Button - 'Save'    (L94, T45, R116, B69)
|    |    |    |    |    |    | ['Save', 'Button', 'SaveButton', 'Button0', 'Button1']
|    |    |    |    |    |    | child_window(title="Save", control_type="Button")
|    |    |    |    |    |    |
|    |    |    |    |    |    | Button - 'Undo'    (L116, T45, R138, B69)
|    |    |    |    |    |    | ['Button2', 'UndoButton', 'Undo']
|    |    |    |    |    |    | child_window(title="Undo", control_type="Button")
|    |    |    |    |    |    |
|    |    |    |    |    |    | Button - 'Redo'    (L138, T45, R160, B69)
|    |    |    |    |    |    | ['Redo', 'Button3', 'RedoButton']
|    |    |    |    |    |    | child_window(title="Redo", control_type="Button")

...
Performing actions with elements
For certain types of elements, such as buttons and text fields, the Windows Inspector will also generate some action suggestions that can be performed with that element along with the code.
## Select an item from the combo box, item can be either a 0 based index of the item to select, or it can be the string that you want to select
target_element.select()
## Return the selected item text from the combo box
target_element.selected_text()
## Return the text of all items in the combo box
target_element.texts()
Tip
If you are not very sure about the type of action you need to perform, or are dealing with more complex elements, consult the pywinauto documentation for more details on the methods available for each different type of element.
As we saw earlier, it is also possible to perform the action of a key or keyboard shortcut directly in the context of an element.
Having the reference of the target element, we can use the type_keys or send_keys method with the following combinations:
In the context of pywinauto, the CTRL key can be represented by: ^.
Examples:
In the context of pywinauto, the ALT key can be represented by: %.
Examples:
Tip
Access the pywinauto documentation reference for more details on keyboard actions.
Best practices when using BotCity Windows Inspector
Below, we list some tips and important points that can facilitate the use of Windows Inspector during the development of your automations.
Ensure that this is the best approach for your application
The operation of BotCity Windows Inspector is directly related to the behavior of the Desktop application being automated.
Therefore, it is important to identify if this strategy is truly the best for your use case.
If the application you are automating does not display much information about the elements or the behavior does not allow this type of interaction, consider other options such as the use of computer vision.
Map and test your code in parts
To ensure that element references are not lost when changing context, try mapping small sets of elements and generating the corresponding code before closing the application or moving on to the next step in the process.
It is important that you also validate in the code whether the connection to the application is being made correctly (remember to use the backend technology compatible with your application) and whether the elements are being found correctly.
By doing this, you ensure that at the end of the process all actions are performed as expected.
Validate the interactions that the mapped elements accept
In some cases, interaction with a particular element can be done in various ways.
Depending on the application, the action of a button may be performed through a click() or even by executing a keyboard shortcut using type_keys().
If you are having difficulties using a particular action, remember to test other available options and validate what works best in your context.
If you have questions or want to see more about this type of content, feel free to explore the BotCity community channels.

