SSO (Single Sign-On)
SSO (Single Sign-On) is an authentication mechanism that allows users to access the platform using credentials already existing in their corporate identity provider (such as Google Workspace, Microsoft Azure AD, and others), without the need to create or manage a separate password.
With SSO enabled, the login process is centralized and controlled by the organization, bringing benefits to both users and administrators.
- Users: access the platform with the same credentials they already use daily.
- Administrators: have centralized control over access, being able to revoke permissions immediately from the identity provider.
Who has access?
Only users with the Administrator role in the Organization have access to this feature's settings.
See more at User roles: Security Center.
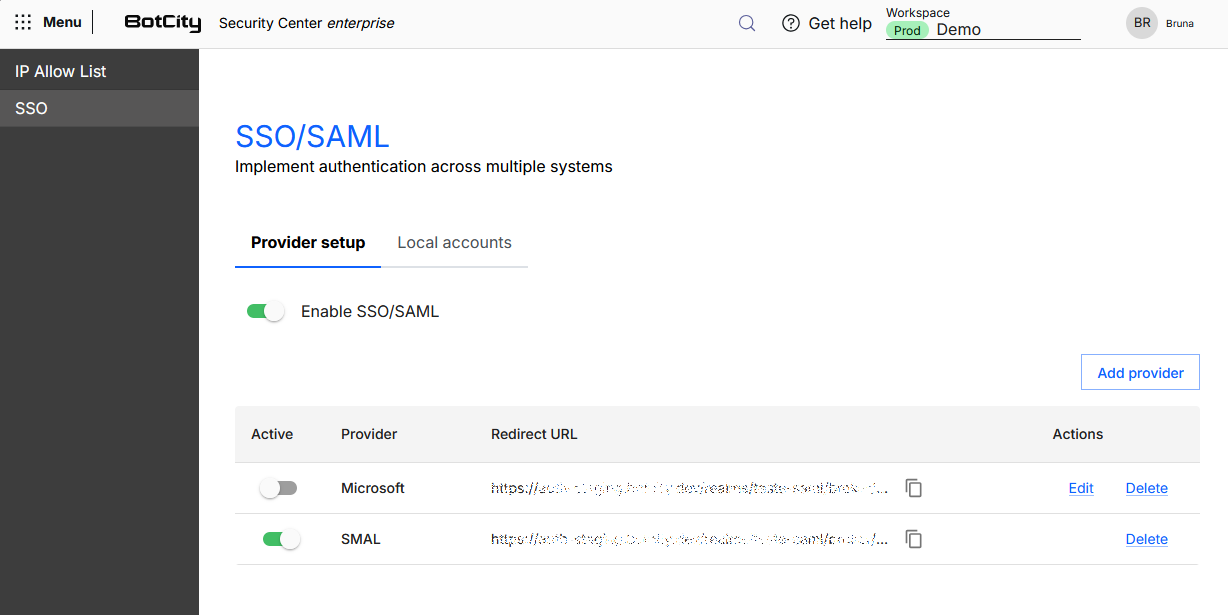
Provider Configuration
To enable SSO/SAML, go to:
- Security Center in the global menu
- SSO menu
- Provider Configuration tab
- Configure the providers
You can configure one or more identity providers (IdPs).
Each provider has its own settings, see each one below. The available providers are:
- Social IdPs
MicrosoftGoogle
- User-Defined IdPs
SAML v2.0OpenID Connect v1.0
Attention!
When disabling SSO, users who accessed exclusively via SSO will lose access to the platform.
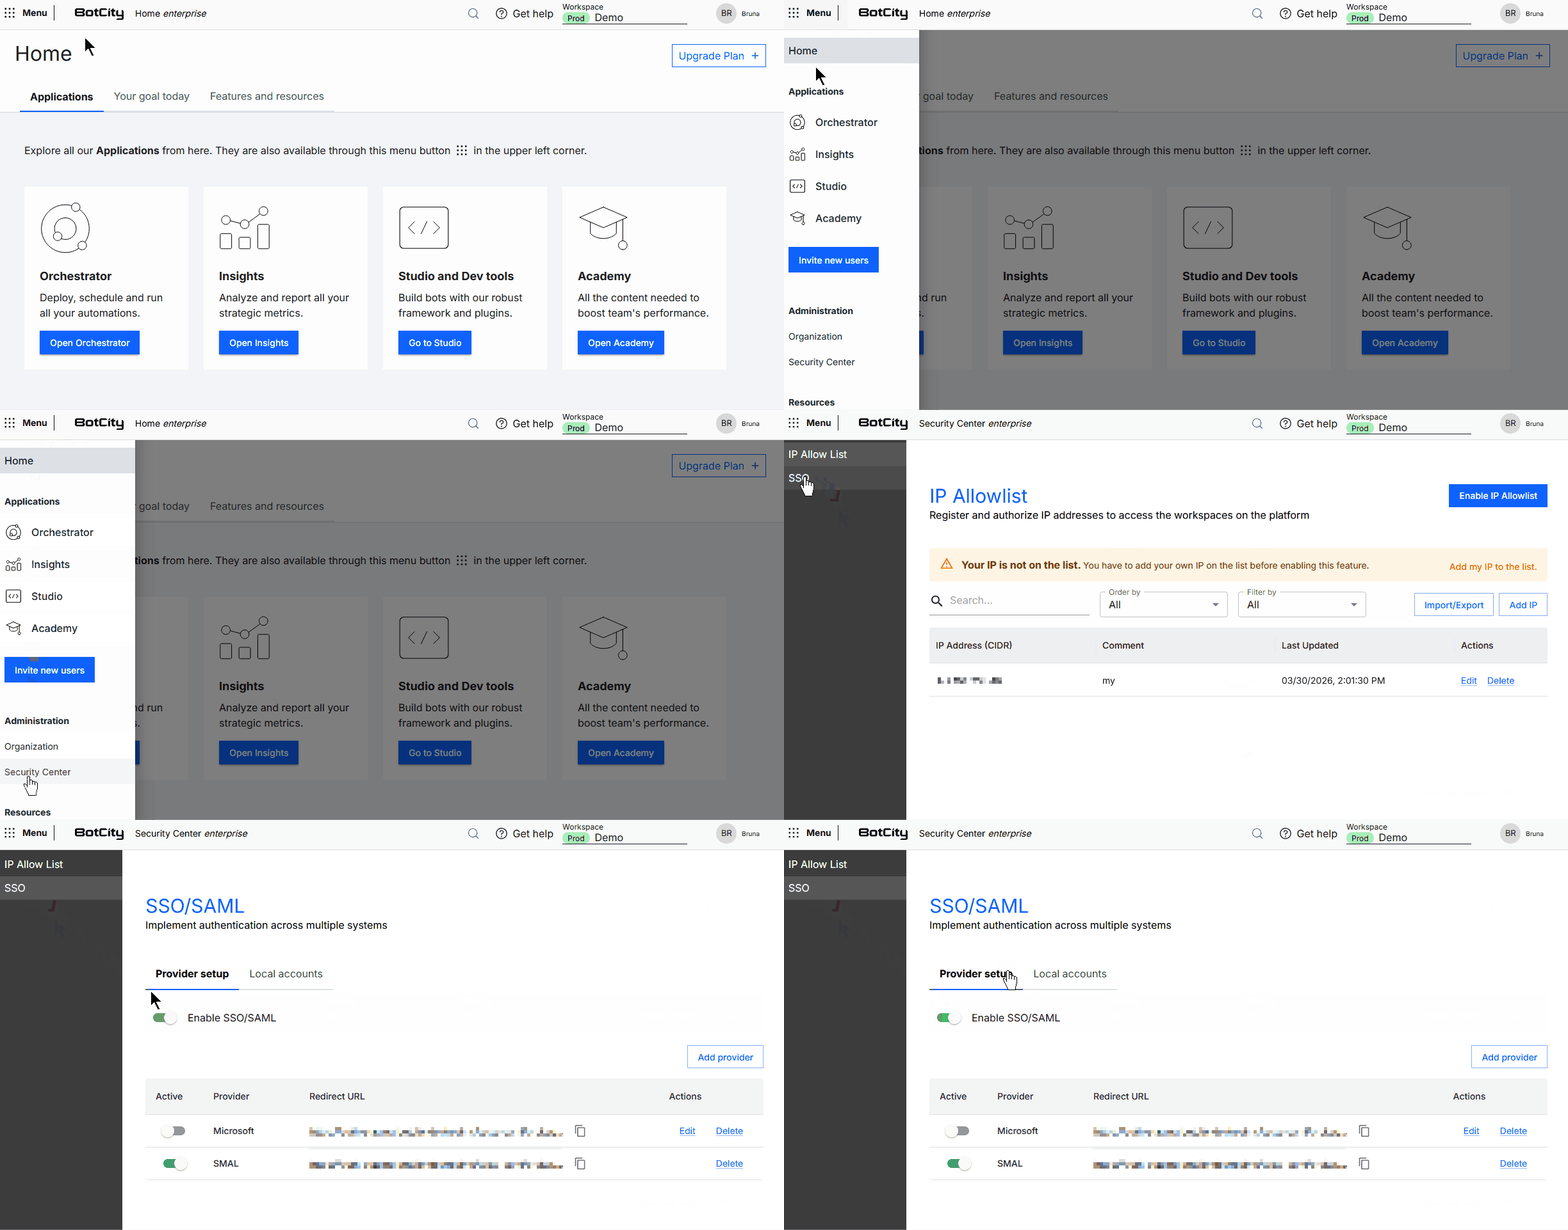
Social IdPs (Microsoft and Google)
To configure Social IdPs, you need the following information:
- Client ID
- Client Secret
Where to find this information?
Microsoft
- Portal: Azure Portal
- Path:
- Azure Active Directory →
- App registrations →
- New registration
- Official documentation: Microsoft identity platform
- Guide: Creating Microsoft 365 Credentials
- Portal: Google Cloud Console
- Path:
- APIs & Services →
- Credentials →
- Create Credentials →
- OAuth Client ID
- Official documentation: Google Identity
- Guide: Creating Google Credentials
Attention!
The Redirect URL must be copied and configured in the IdP environment to complete the integration. Use the copy button available in the table.
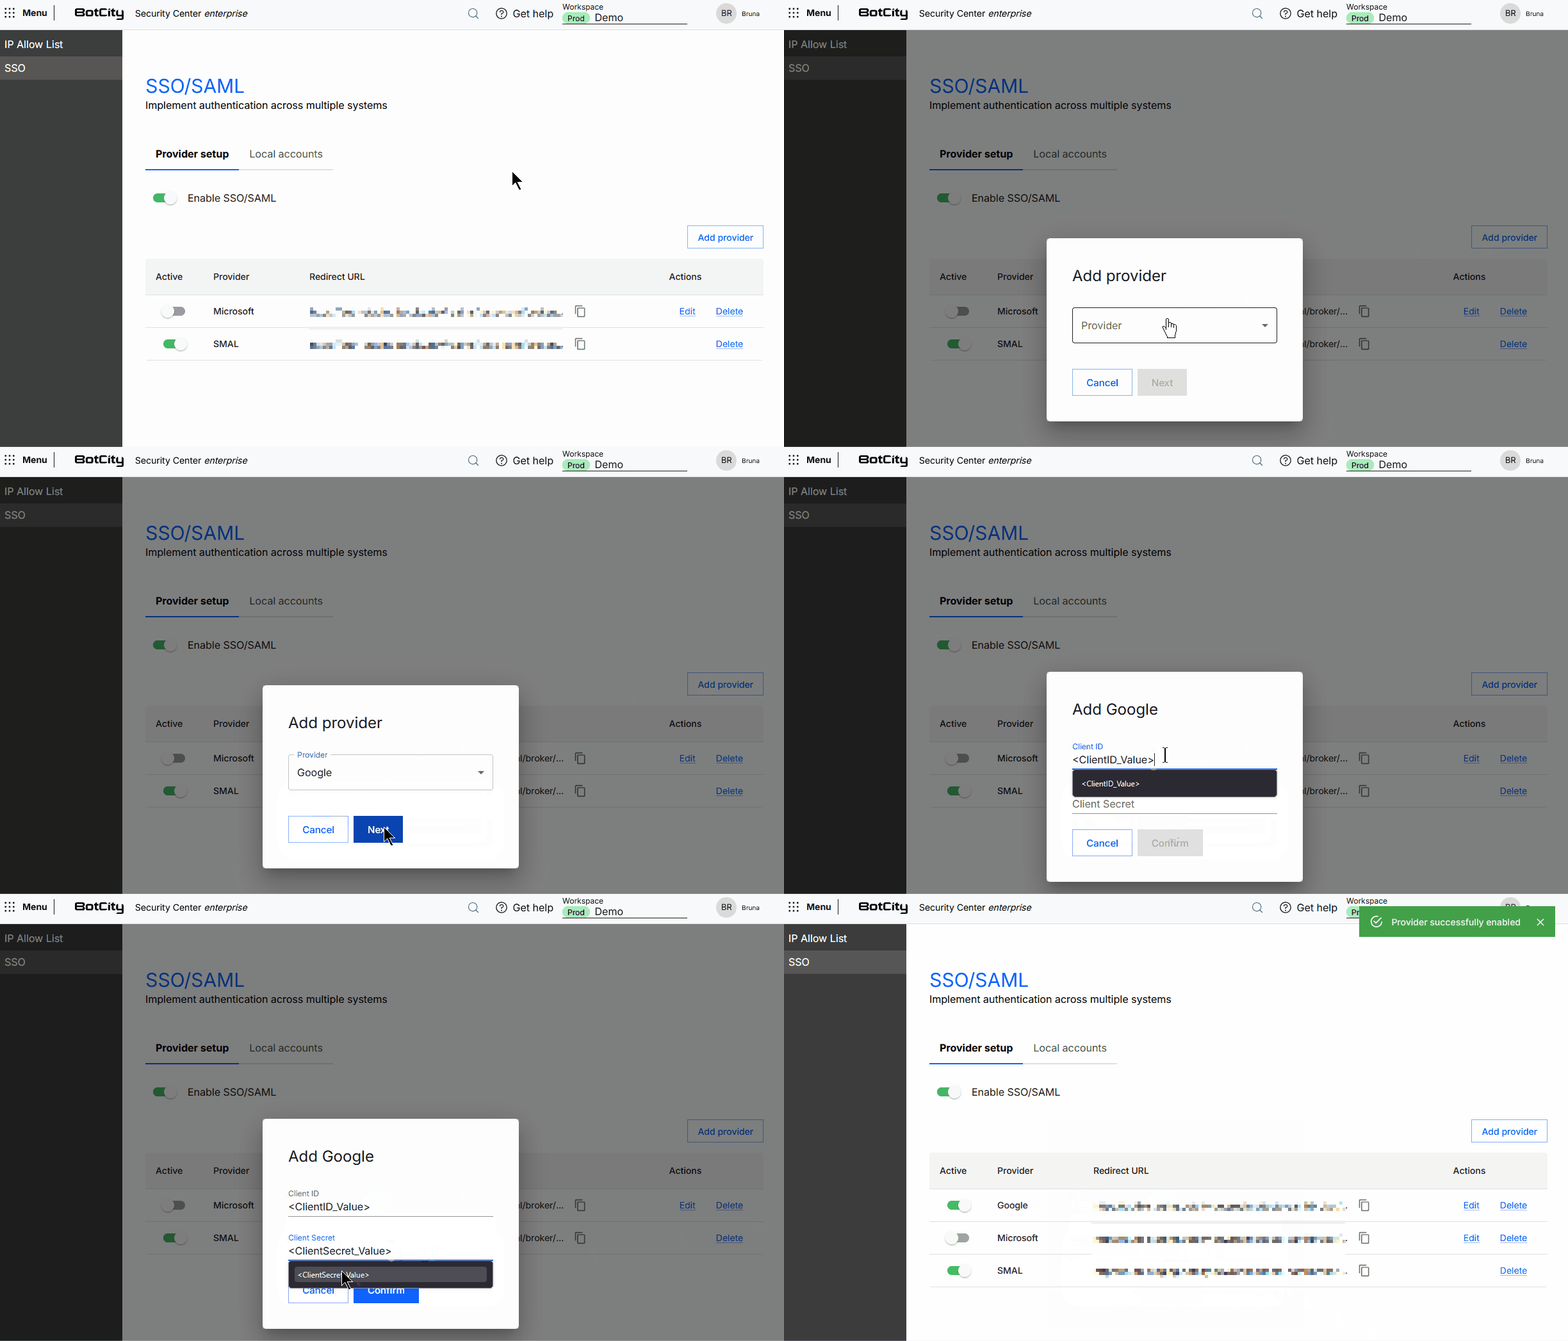
SAML v2.0
To configure SAML v2.0, you need the following information:
- Display Name
- Service Provider Entity ID
- IdP configuration file
Where to find this information?
You typically download this .xml configuration file directly from your IdP panel (e.g.: Okta, Azure AD, Google Workspace).
Attention!
The Redirect URL must be copied and configured in the IdP environment to complete the integration. Use the copy button available in the table.
Example IdP Configuration File
<?xml version="1.0" encoding="UTF-8"?>
<md:EntityDescriptor xmlns:md="urn:oasis:names:tc:SAML:2.0:metadata" entityID="https://your-idp.example.com/auth/realms/your-realm">
    <md:IDPSSODescriptor protocolSupportEnumeration="urn:oasis:names:tc:SAML:2.0:protocol">
        <md:KeyDescriptor use="signing">
            <ds:KeyInfo xmlns:ds="http://www.w3.org/2000/09/xmldsig#">
                <ds:X509Data>
                    <ds:X509Certificate>YOUR_BASE64_ENCODED_X509_CERTIFICATE_HERE</ds:X509Certificate>
                </ds:X509Data>
            </ds:KeyInfo>
        </md:KeyDescriptor>
        <md:SingleSignOnService Binding="urn:oasis:names:tc:SAML:2.0:bindings:HTTP-Redirect" Location="https://your-idp.example.com/auth/realms/your-realm/protocol/saml"/>
    </md:IDPSSODescriptor>
</md:EntityDescriptor>
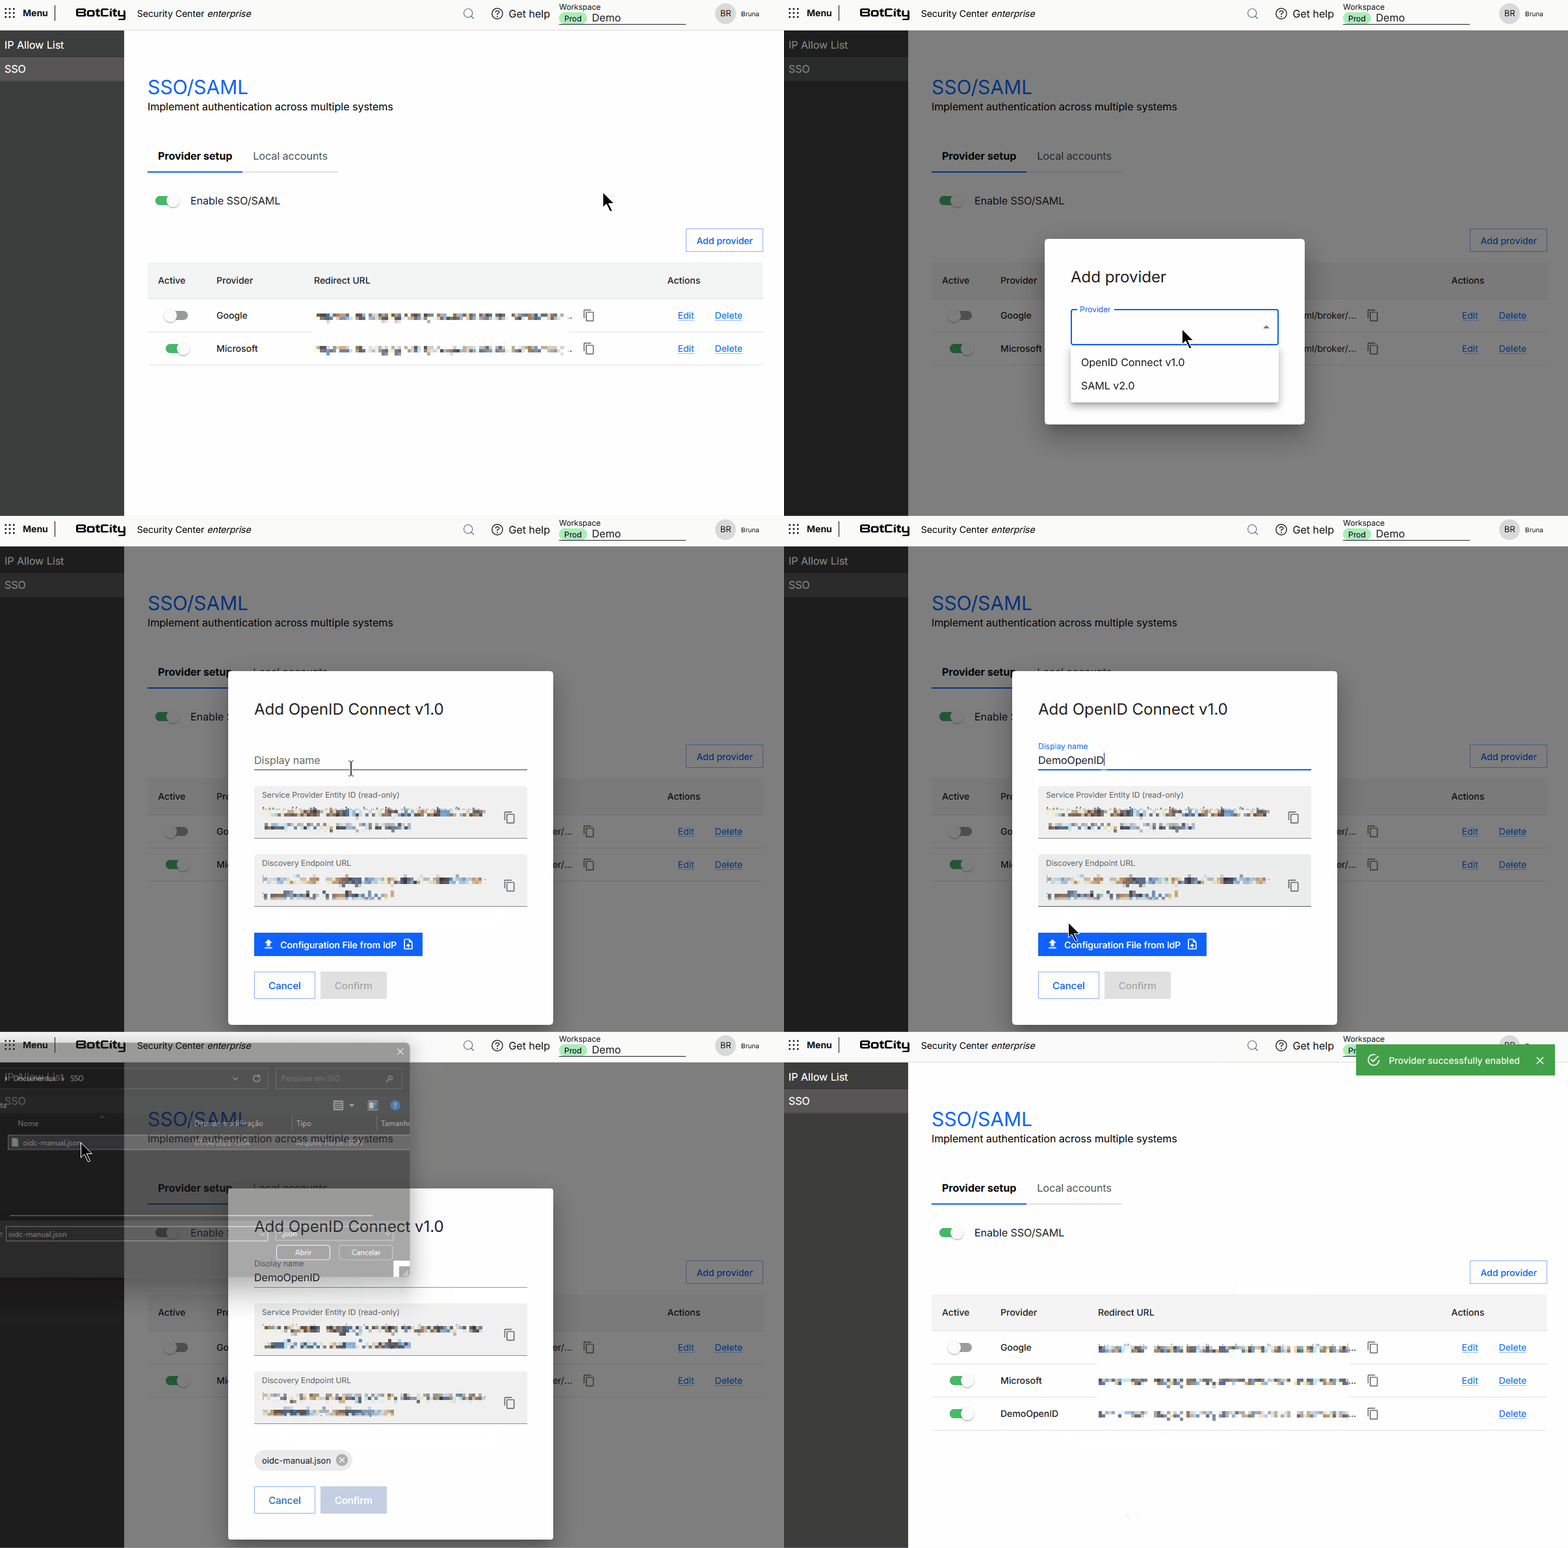
OpenID Connect v1.0
To configure OpenID Connect v1.0, you need the following information:
- Display Name
- Service Provider Entity ID
- Discovery Endpoint URL
- IdP configuration file
Where to find this information?
You typically download this .json configuration file directly from your IdP panel (e.g.: Okta, Azure AD, Google Workspace).
Attention!
The Redirect URL must be copied and configured in the IdP environment to complete the integration. Use the copy button available in the table.
Example IdP Configuration File
{
  "alias": "oidc-manual",
  "providerId": "oidc",
  "enabled": true,
  "config": {
    "authorizationUrl": "https://idp.example.com/oauth2/authorize",
    "tokenUrl": "https://idp.example.com/oauth2/token",
    "userInfoUrl": "https://idp.example.com/oauth2/userinfo",
    "jwksUrl": "https://idp.example.com/oauth2/jwks",
    "issuer": "https://idp.example.com",
    "clientId": "YOUR_CLIENT_ID",
    "clientSecret": "YOUR_CLIENT_SECRET"
  }
}
Activation
With the configurations done, you can enable and disable SSO/SAML login.
You can also manage each provider directly in the control panel, with the actions:
- Enable: Button to enable or disable a specific provider.
- Edit: Edit the configured information of a provider.
- Delete: Delete the configuration of a provider.
Local Accounts
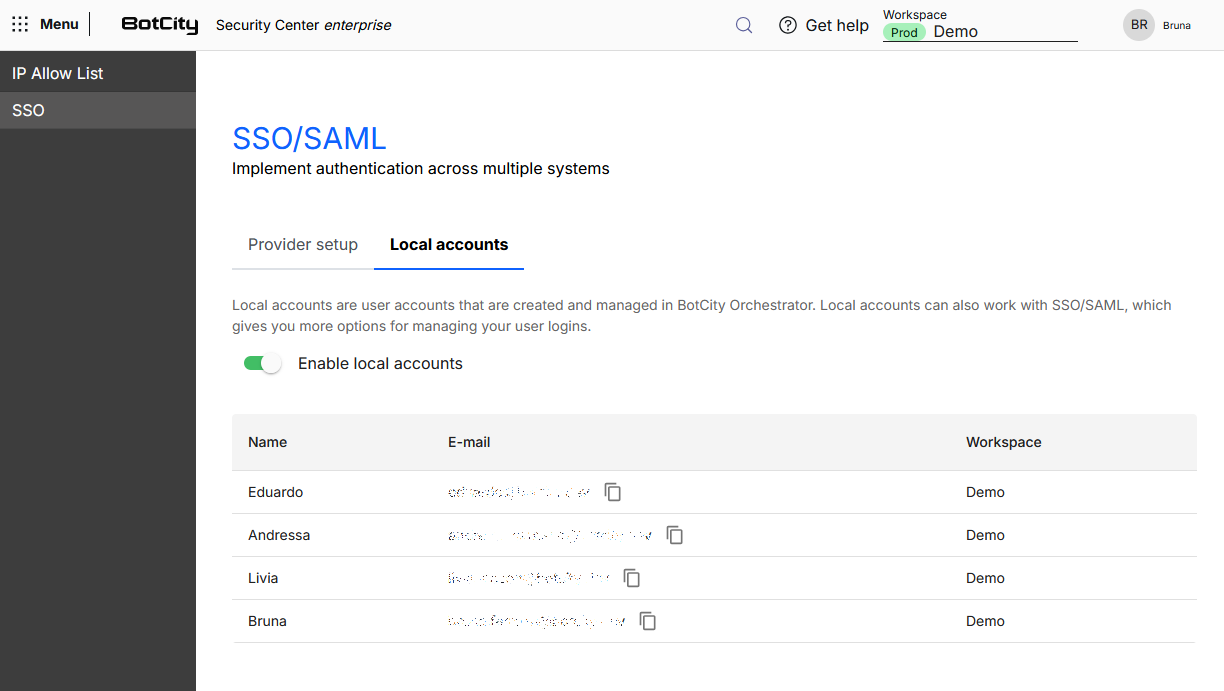
Local accounts are all accounts registered in Organization.
Here you can view the list of accounts registered in each workspace and allow these users to continue accessing the platform via Email and Password.
To enable local accounts, go to:
- Security Center in the global menu
- SSO menu
- Local Accounts tab
- Click
Enable local accounts.
Tip
You can enable and disable this feature whenever necessary.
Attention!
When disabling local accounts, users who accessed exclusively via Email and Password will lose access to the platform.
Impact on Other Features
The SSO configuration affects the following areas of the platform:
User Invitation
- The option to mark a user as local and non-SSO is displayed only if local accounts are enabled in the workspace.
- SSO users do not receive a temporary password in the invitation.
- Local users receive a temporary password in the invitation.
Login Screen
- Federated login options are displayed according to the configured providers.
Password Update and Recovery
- Not allowed for SSO users. In these cases, the password must be updated directly in the access provider.