Users and Groups
The Users and Groups feature lets you manage the entire workspace access cycle: invite new users, define their roles and permissions in the Organization and in the Products, organize them into groups to control access to specific resources, and edit or delete users and groups whenever necessary.
View
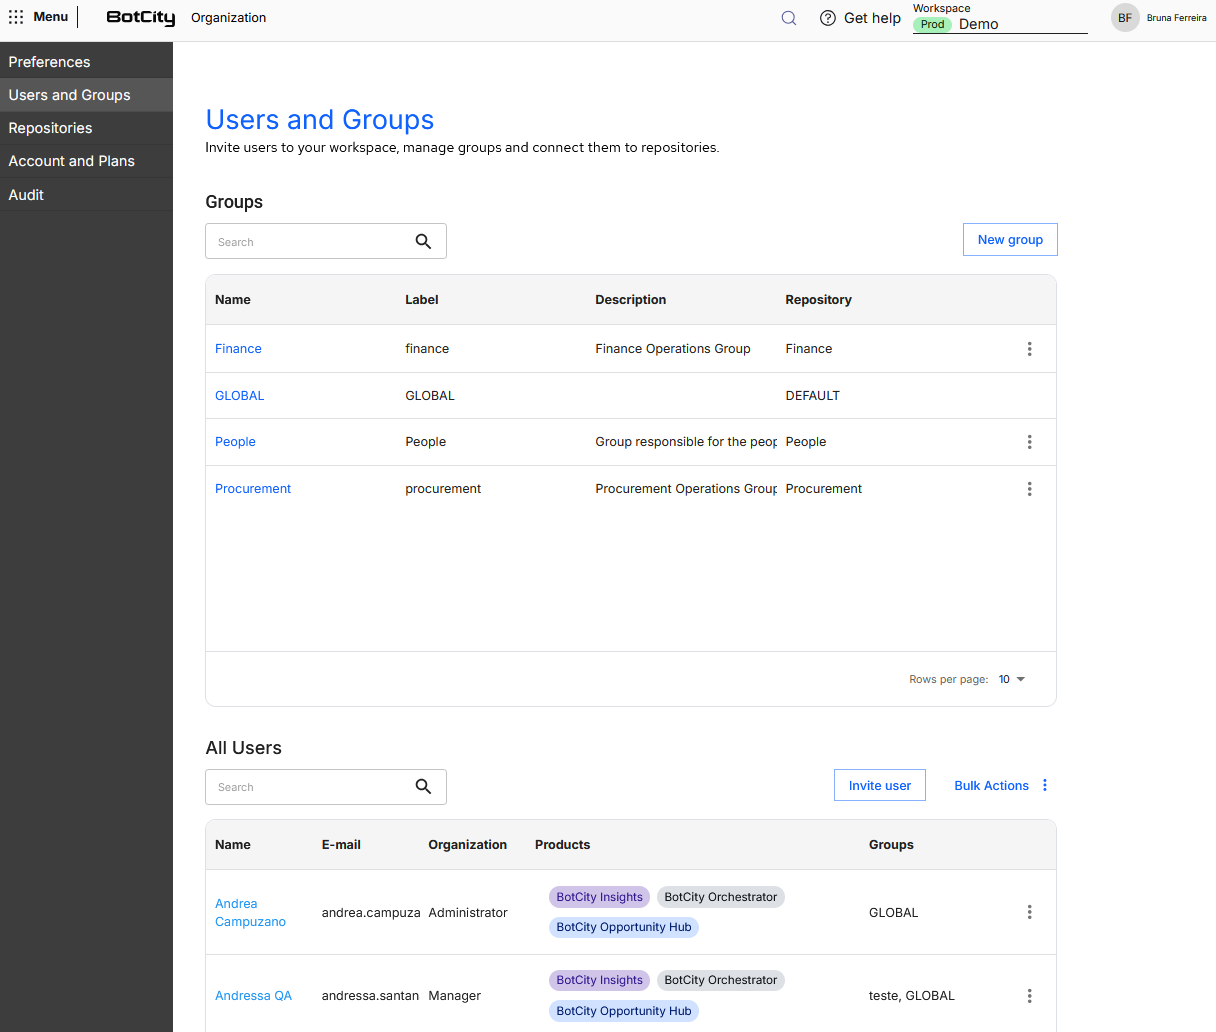
In the Users and Groups menu, you find the Groups and All users tables linked to your workspace.
Groups
A user group can be seen as a set of users with specific privileges to access and operate entities in the BotCity Orchestrator and Insights.
In the Organization you can create user groups, making it possible to manage and direct resources to a specific team, sector or area of your company.
This way, each group has access only to the resources related to its own area, bringing more organization and productivity to the teams and to the automation flows.
Users in more than one group
The same user can belong to several groups at the same time, accumulating access to the resources linked to each one of them.
See more at:
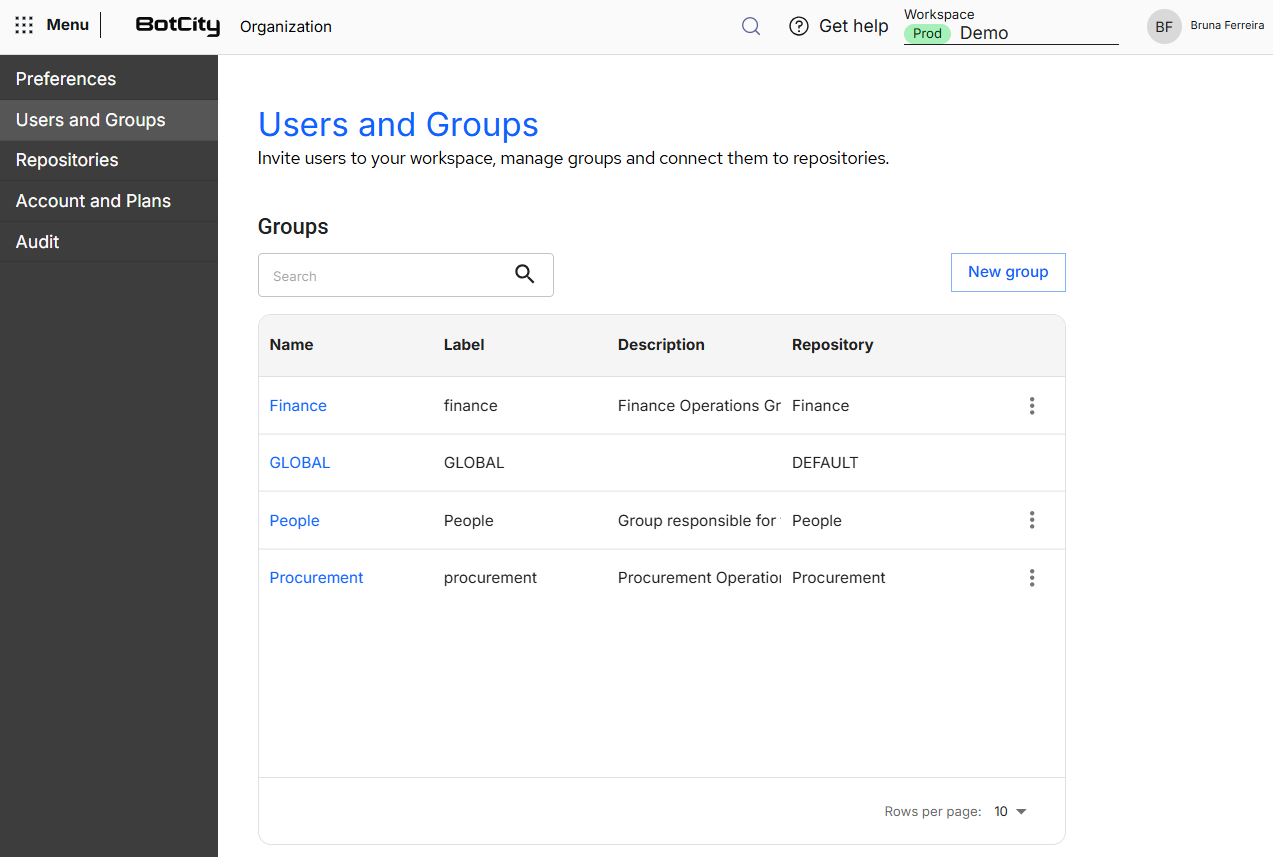
The Groups table presents all groups created for this workspace with the following information in columns:
- Name: display name of the group, defined at creation time.
- Label: unique identifier of the group within the workspace, used to reference it in the platform.
- Description: free text explaining the purpose of the group, such as the area or the team it serves.
- Repository: repository linked to the group, which determines which resources the users of this group can access and operate.
- Actions menu: available in the three-dot icon at the end of each row, with the options:
Information: opens the screen with the group data and the list of members.Edit: allows changing the name and the description of the group.Delete: removes the group from the workspace.
GLOBAL group
Every workspace created in the BotCity Organization has a default group with the GLOBAL identifier.
This group cannot be edited or deleted. If no new groups are created in the workspace, all users are directed to this default group.
Create a user group
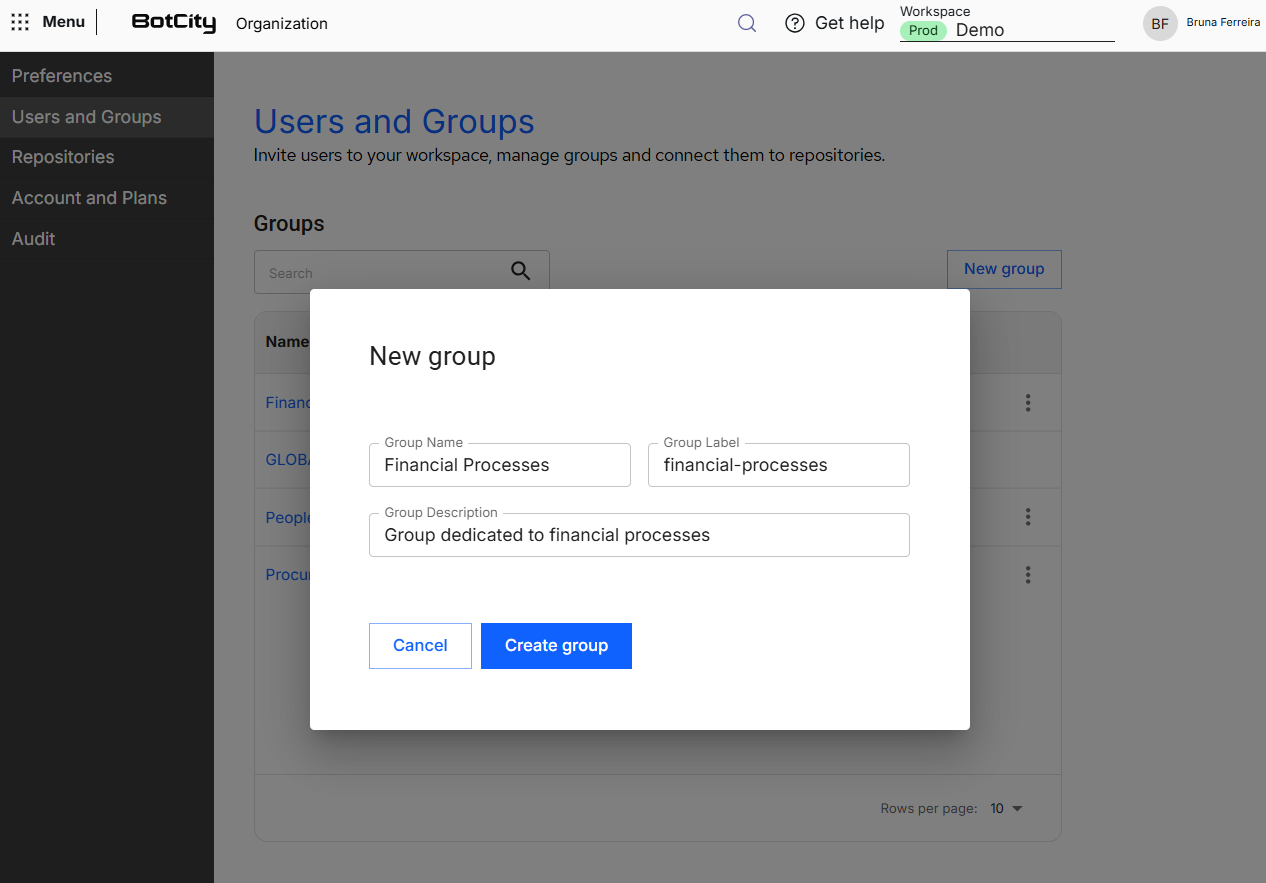
To create a group in the BotCity Platform, click the New group button and fill in the form:
- Group Name: display name of the group, used to identify it in the Groups table.
- Group Label: unique identifier of the group within the workspace, used to reference it in the platform.
- Group Description: free text explaining the purpose of the group, such as the area or the team it serves.
When you confirm the action by clicking Create group, a new group is created and added to the list of groups of this workspace.
Group information
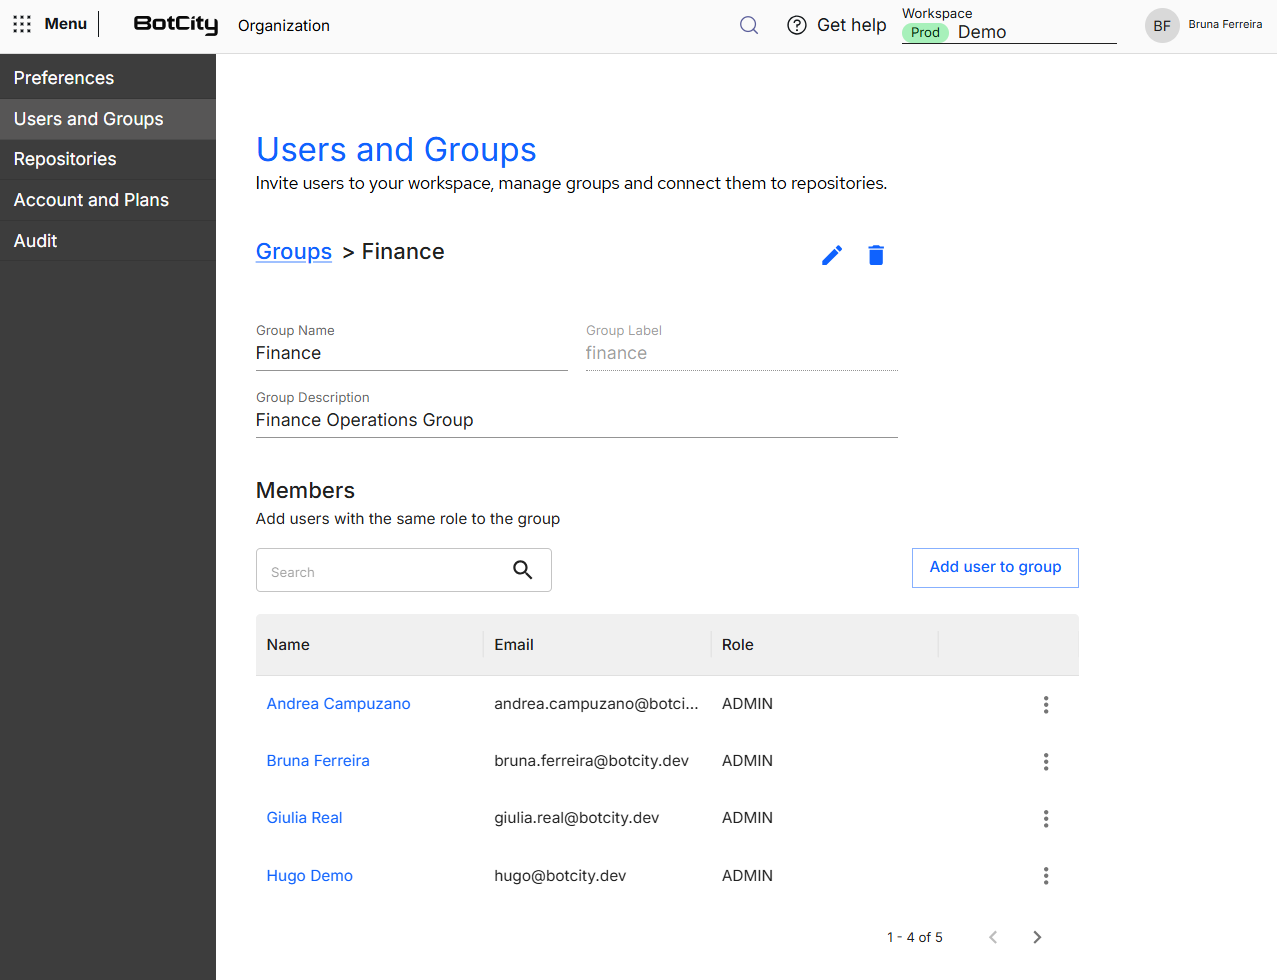
To open the information of a group, click its name in the Groups table or select the Information option in the actions menu.
On this screen you find:
- Group data: the name, the label and the description defined at the group creation.
- Edit and delete icons: next to the group name, they allow changing the group data or removing it from the workspace.
- Members: table with the users that belong to the group, in the columns:
NameE-mailRoleOptions menu: Edit and Remove user from group.
Add user to groupbutton
Add user to group
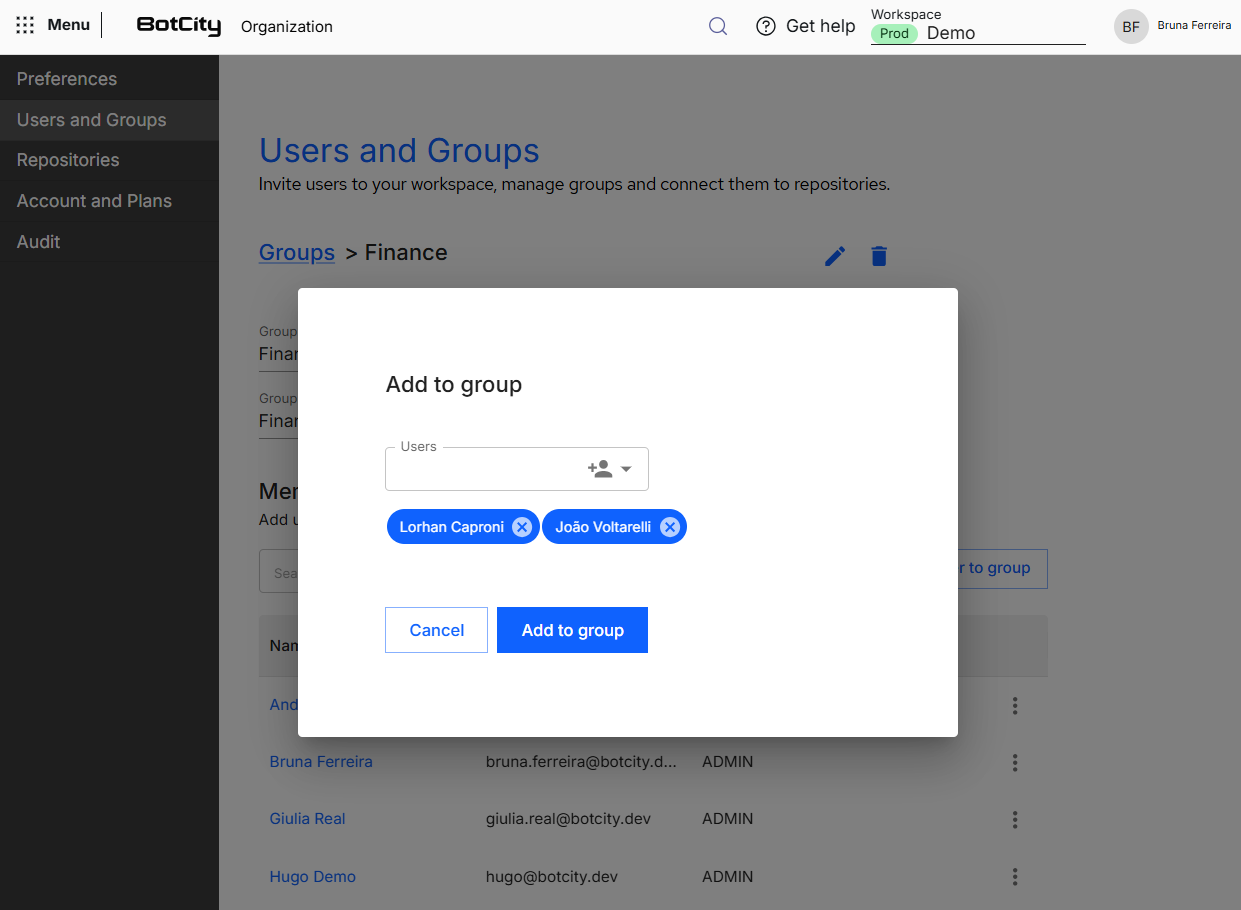
Still on the group information screen, click the Add user to group button to open the form.
In the Users field, select all users that will have access to the resources linked to this group. Each selected user appears as a tag below the field and can be removed through the close icon.
When you confirm the action by clicking Add to group, the selected users start being displayed in the Members table of the group.
Resources linked to a group
Platform resources can be linked to specific groups, so that only the users of that group can view and operate them.
See more at:
Remove user from group
On the group information screen, find the user in the Members table, click the options menu and select the Remove user from group option.
The user stops appearing in the Members table and loses access to the resources linked to this group, but remains active in the workspace and in the other groups they belong to.
Removing from a group is not deleting from the workspace
To remove a user from the workspace entirely, see the Delete user section.
Users
In the Organization you can invite new users to the BotCity Platform workspace, define the role of each one in the administration and in the products, link them to groups and remove the accesses that are no longer necessary.
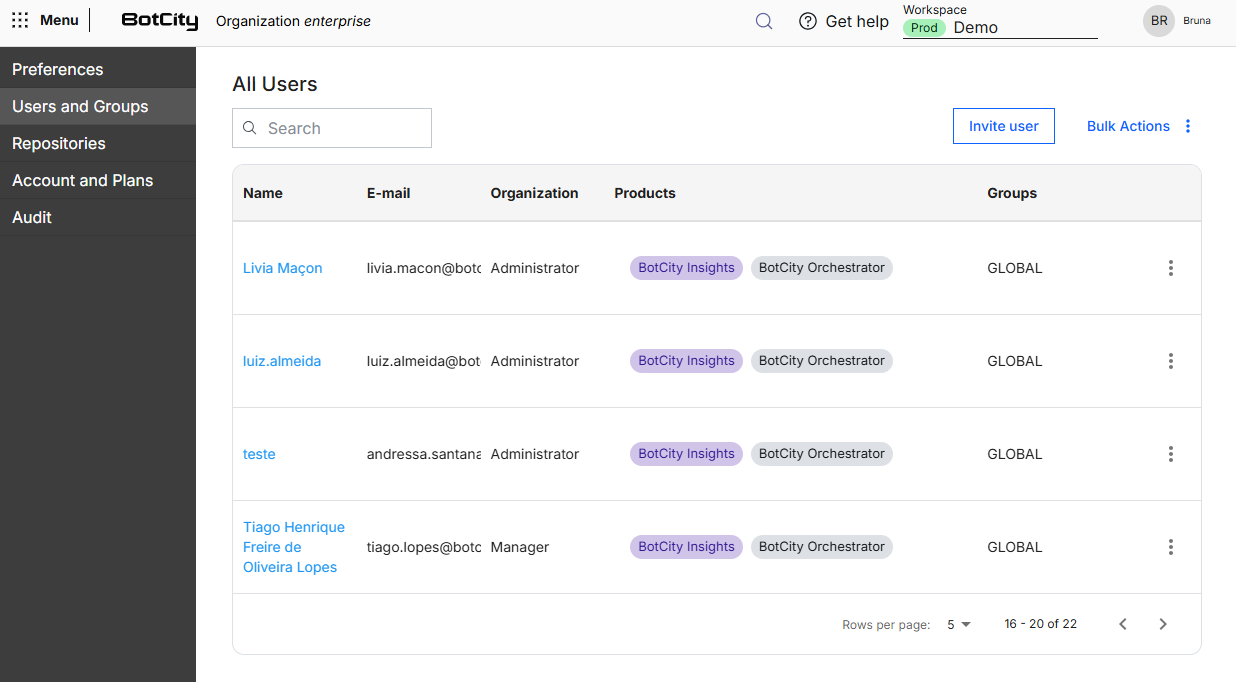
The All users table presents all users linked to this workspace with the following information in columns:
- Name: display name of the user.
- E-mail: e-mail address used to access the platform and receive the notifications.
- Organization: role of the user in the workspace administration.
- Products: products the user has access to, displayed as tags.
- Groups: groups the user belongs to.
- Actions menu: available in the three-dot icon at the end of each row, with the options:
Edit: opens the user details page.Add to group: links the user to one or more groups.Delete: removes the user from the workspace.
Above the table are the search field, the Invite user button and the Bulk Actions menu, which applies the same action to several users at once.
Invite users to the workspace
You can easily invite new users to be part of your BotCity Platform workspace.
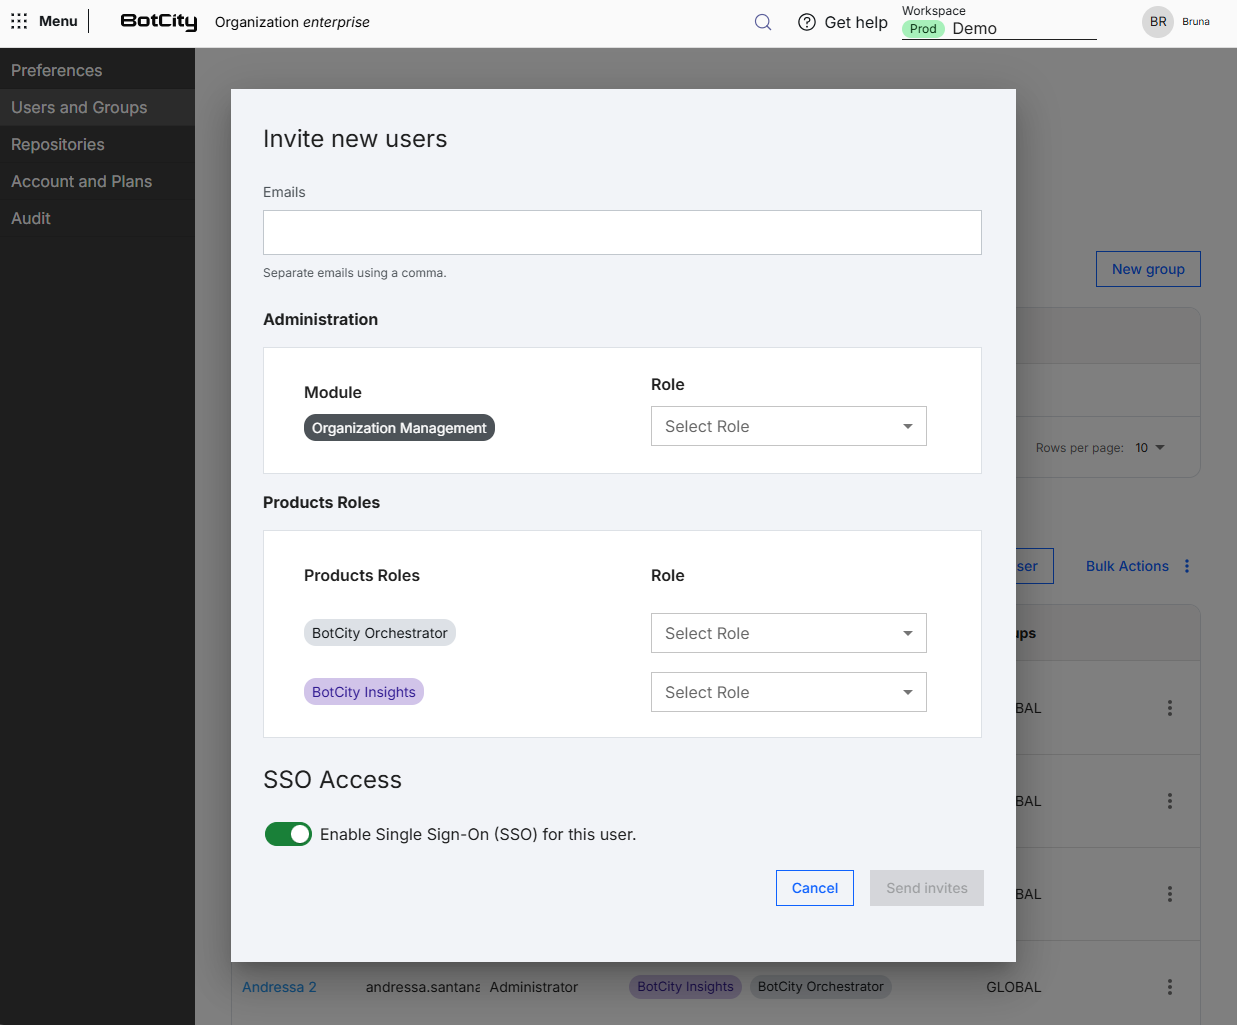
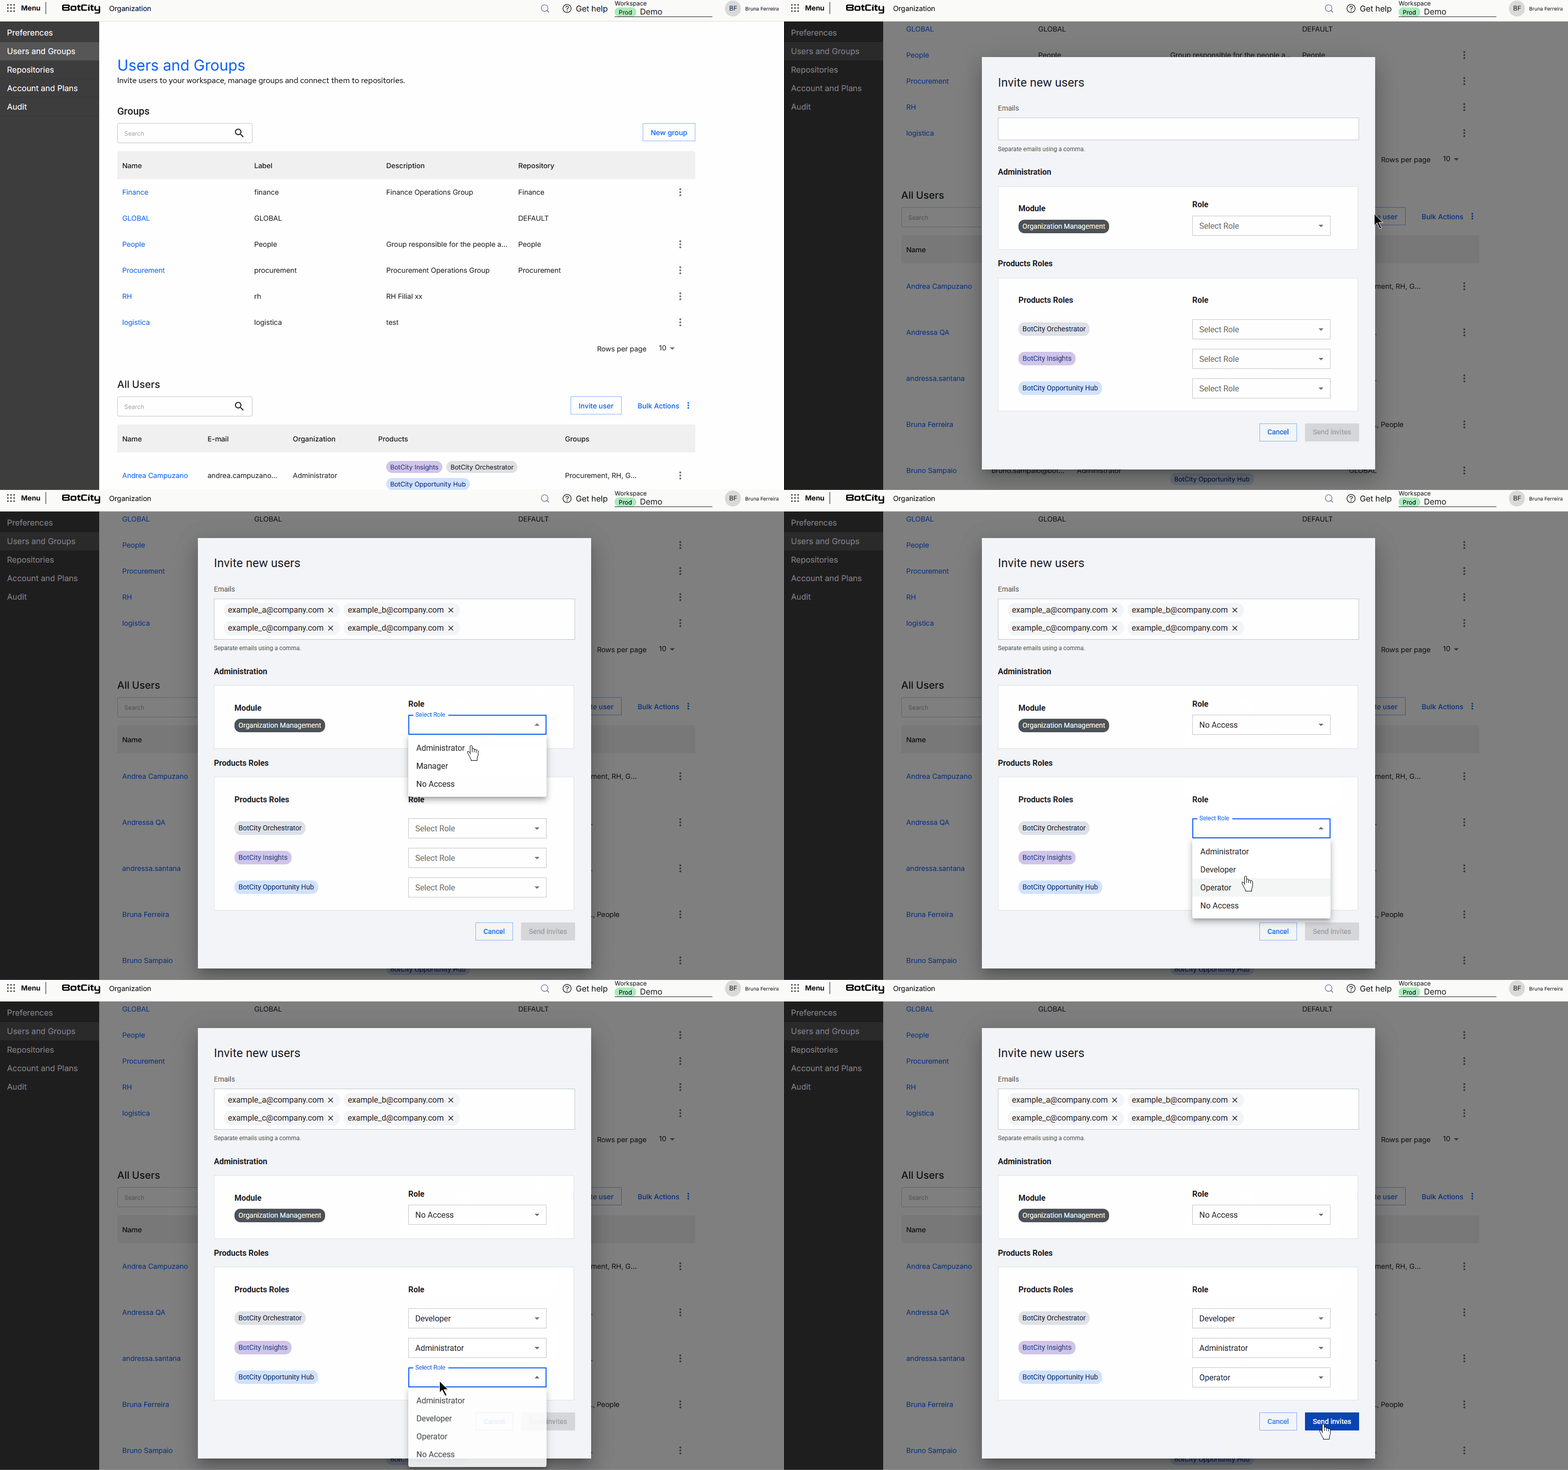
To invite a new user, click the Invite user button and fill in the form:
- Emails: e-mail addresses of the users that will receive the invitation, separated by comma.
- Administration: defines the role of the user in the workspace administration modules:
Organization: access to the workspace settings such as users and groups, repositories, audit.
- Products: defines the role of the user in each contracted product:
Orchestrator: access to the deployment, scheduling and monitoring of the automations.Insights: access to the dashboards and reports of your automation initiative.
- SSO: enables login through SSO (Single Sign-On) for the invited users.
After filling in the data, click the Send invites button. The users are invited to access this workspace and receive the information for the first access in the registered e-mail.
Available roles
Each module and product has its own set of roles, and the Role field stays empty until you choose one of them.
See more at:
Invitation limit
You can send invitations to up to 100 users simultaneously.
All e-mails entered receive the same roles defined both in the Administration and in the Products, to define different roles, send separate invitations.
Invitation example
Here is an example of a form to invite a user:
User roles
The assignment of roles in the BotCity products lets you control the access level and the permissions each user has within the platform.
Organization
The roles available in this module are:
- Administrator: full access to the workspace administration, including inviting users, revoking accesses and deleting users.
- Manager: access to the same functionalities as the Administrator, except inviting users, revoking accesses and deleting users from the workspace.
- No access: the user neither views nor operates the Organization section.
See the access level for each functionality within Organization:
| Administrator | Manager | |
|---|---|---|
| Preferences | ||
| Users and Groups | Partial access | |
| Repositories | ||
| Accounts and Plans | ||
| Audit |
An Organization administrator is a product administrator
When you select the Administrator role in the Organization, the user automatically becomes an Administrator in the Orchestrator and in the Insights as well, and the role selectors of these products are locked.
To grant a different role in one of the products, choose another role in the Organization.
Partial access of the Manager in Users and Groups
The Manager role accesses all functionalities of the Organization, including the creation and the editing of groups.
The only limitation is that the Manager cannot invite, revoke accesses or delete users from the workspace. These actions are exclusive to the Administrator role.
Orchestrator
The roles available in this module are:
- Administrator: full access to the Orchestrator functionalities, including the runtime environment settings.
- Developer: access to the development, the deployment and the operation of the automations.
- Operator: access to the execution and the follow-up of the automations, with view only for alerts, errors, logs and records.
- No access: the user neither views nor operates the Orchestrator.
See the access level for each functionality within the Orchestrator:
| Administrator | Developer | Operator | |
|---|---|---|---|
| Dashboard | |||
| Datapool | |||
| Tasks | |||
| New Task | |||
| Easy Deploy | |||
| Alerts | View Only | ||
| Errors | View Only | ||
| Execution Log | View Only | ||
| Result Files | View Only | ||
| Runners | View Only | ||
| Automations | View Only | ||
| Bots | View Only | ||
| Schedules | |||
| Credentials | |||
| Download Studio | |||
| Developer Environment | |||
| Runner Settings | |||
| Integrations |
Insights
The roles available in this module are:
- Administrator: full access to the Insights functionalities.
- Developer: access to the Runner data, the reports and the integrations.
- No access: the user neither views nor operates the Insights.
See the access level for each functionality within the Insights:
| Administrator | Developer | |
|---|---|---|
| Dashboard | ||
| Data Input | ||
| Runner Data | ||
| Reports | ||
| Integrations |
User details
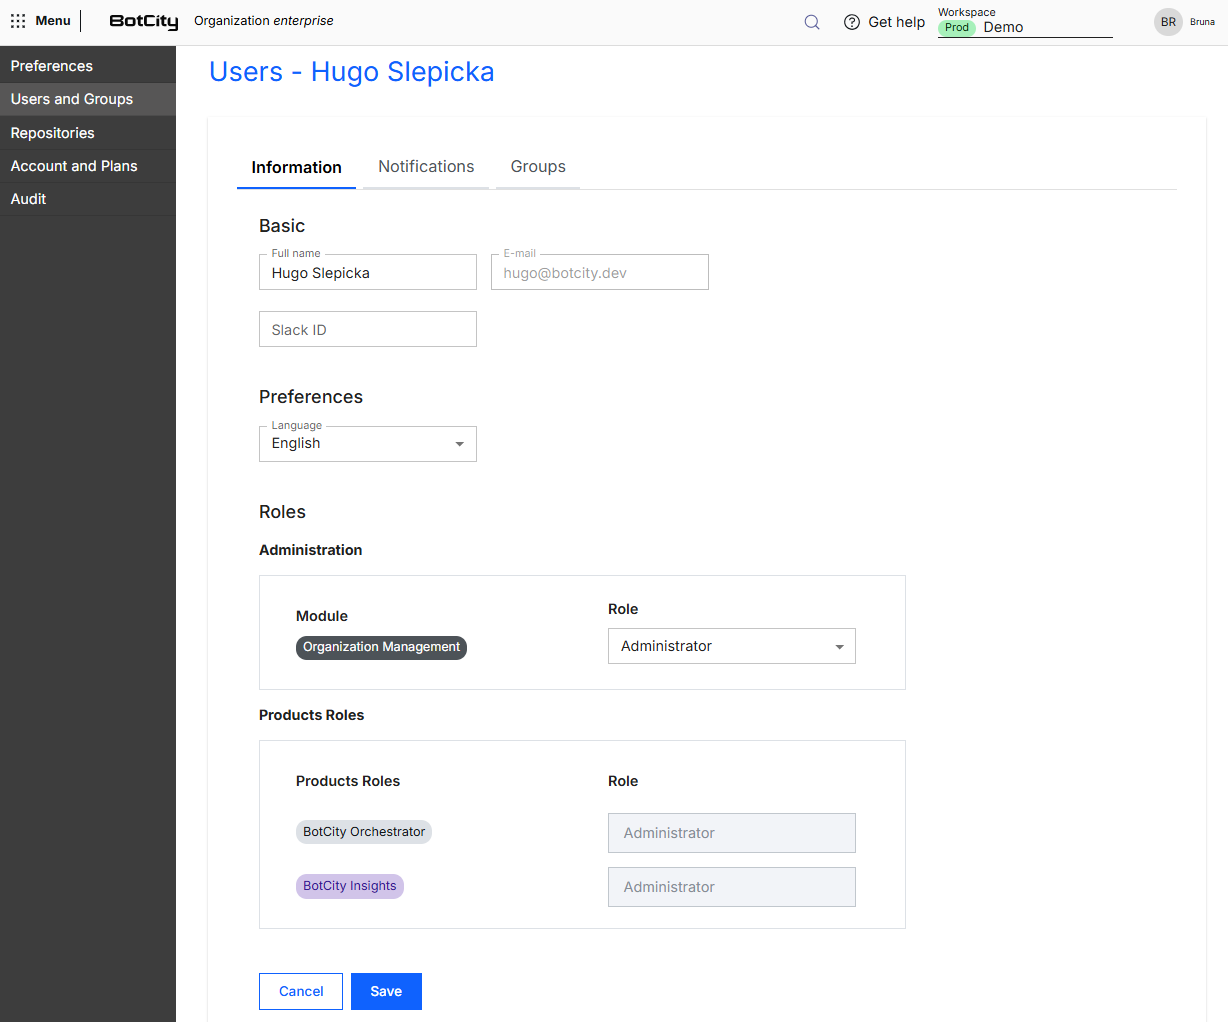
When you click the name of a user in the All users table, you access the details page of that user, organized in the Information, Notifications and Groups tabs.
Information tab
In the Information tab, you consult and edit the basic data of the user:
- Basic: full name, e-mail and Slack ID. The e-mail cannot be changed.
- Preferences: language in which the platform is displayed for this user.
- Roles: role of the user in the Administration and in each contracted product.
After changing the data, click Save to confirm.
Product roles
When the role in the Administration is Administrator, the product roles are fixed as Administrator and cannot be edited.
See more at:
Notifications tab
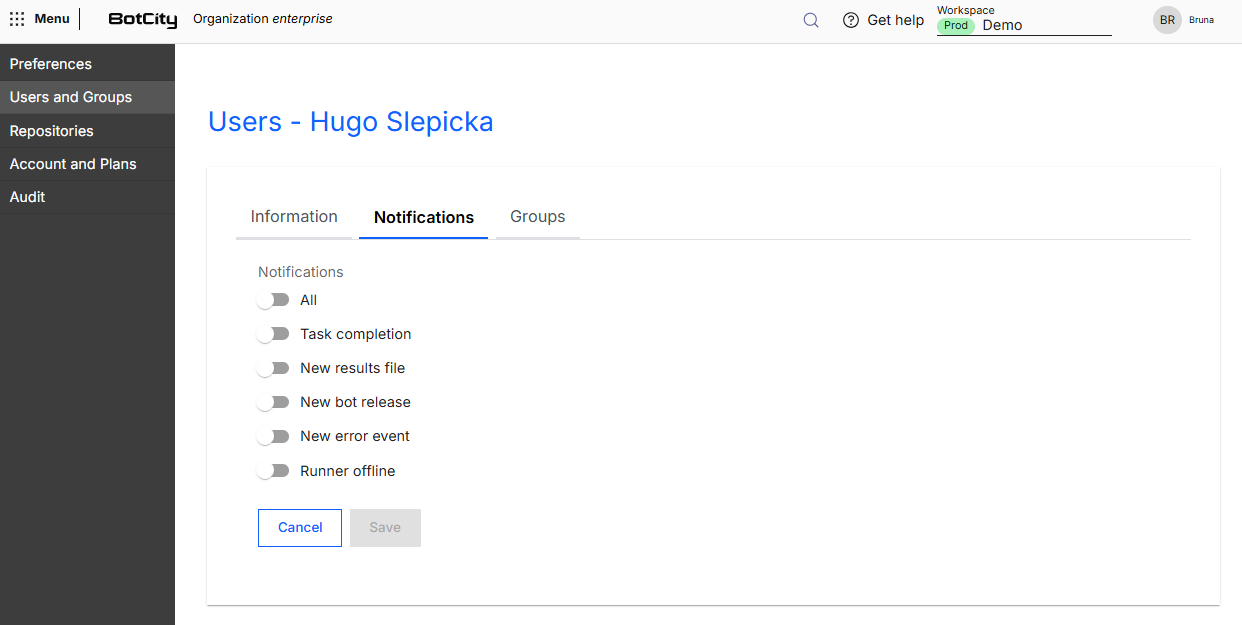
In the Notifications tab, you define which BotCity Orchestrator events generate a notice for this user. Each event has its own selector, and the Orchestrator sends e-mails for each enabled notification.
These are the available events:
- All: all events defined below.
- Task completion: triggered when a task is completed, regardless of the completion status.
- New results file: triggered when a new result file is uploaded to the Orchestrator.
- New bot release: triggered when a new release version of a bot is configured.
- New error event: triggered when an error is reported to the Orchestrator.
- Runner offline: triggered when a Runner goes offline.
After enabling the desired events, click Save to confirm.
Notification channels
The default channel is e-mail, but notifications can be sent to Slack and Microsoft Teams channels, or also through webhooks. For that, the integration setup must be done in the workspace.
See more at:
Groups tab
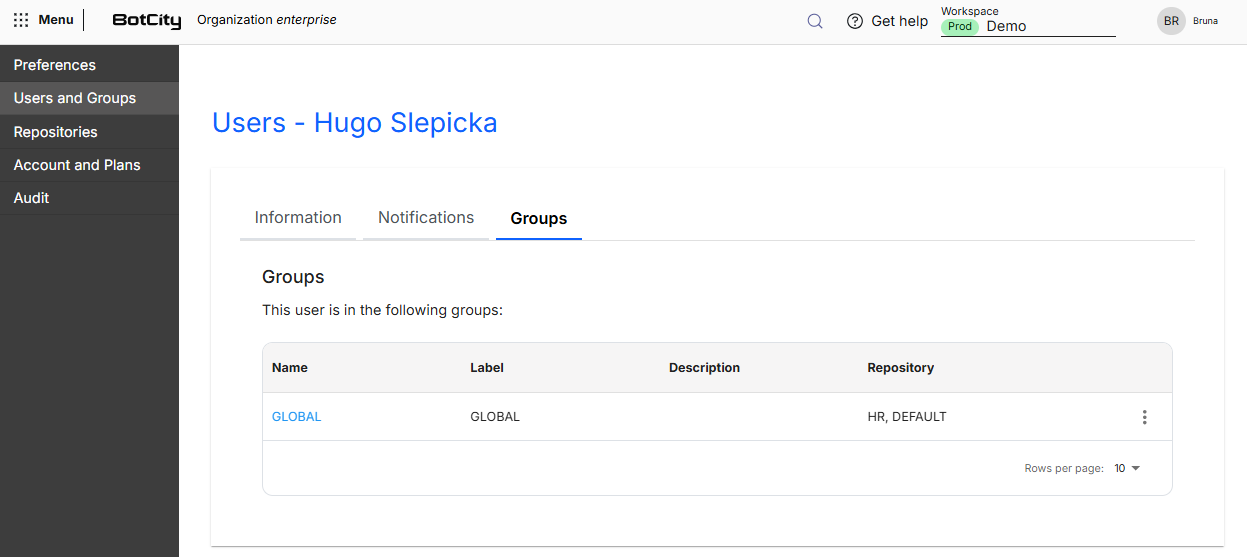
In the Groups tab, you view all groups the user belongs to, with the Name, Label, Description and Repository columns.
Linking a user to a group
This tab shows only the groups the user already has. To link them to a new group, use the group information screen or the actions menu of the All users table.
See more at:
Edit user
To edit a user, click the options menu of the user in the All users table and select the Edit option.
You are directed to the user details page, where you can change the basic information, the roles, the notifications and consult the groups of this user.
Delete user
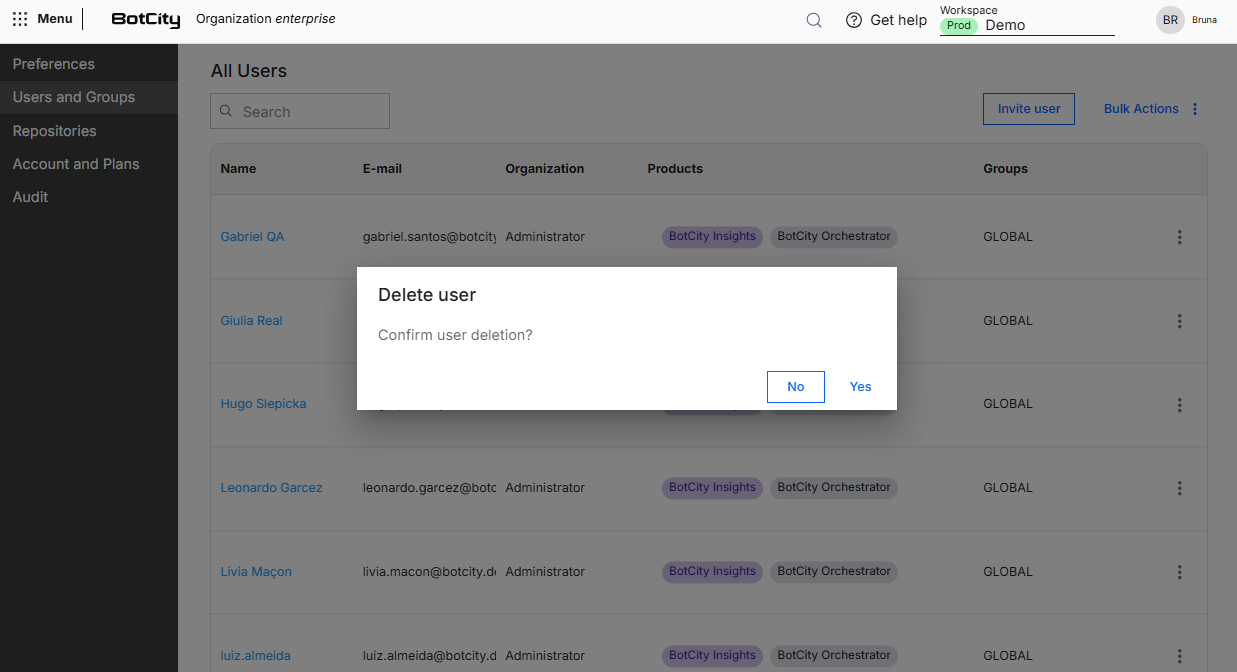
To delete a user, click the options menu of the user in the All users table, select the Delete option and confirm the action by clicking Yes.
The user loses access to the workspace and stops being displayed in the All users table.
Delete users in bulk
The Bulk Actions menu allows deleting several users at once, with the option:
- Bulk delete: you select the users you want to delete and confirm the action.